
OPF195A.Rev1
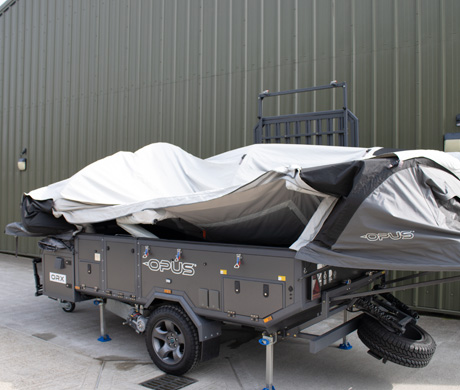
Congratulations on the purchase of your new OPUS® Camper.
You’ve got years of unforgettable experiences ahead of you. First let’s get you acquainted with your new folding camper.
Throughout this manual you will see sections highlighted in two different colours along with icons.
INFORMATION This indicates important information relating to safety, please make sure you read carefully.
INFORMATION This indicates important information which will help you keep your OPUS® Camper in the best condition possible.
![]() This indicates that an accompanying video available. Interacting with this icon will take you to Youtube.
This indicates that an accompanying video available. Interacting with this icon will take you to Youtube.
Please observe the requirements for correct usage, storage and ‘weathering’ before first use.
Practice the set-up at your leisure and prepare thoroughly ahead of your first trip.
Click a topic from below to navigate directly to that page. You can return to the contents page at any time by clicking the link in the page footer.
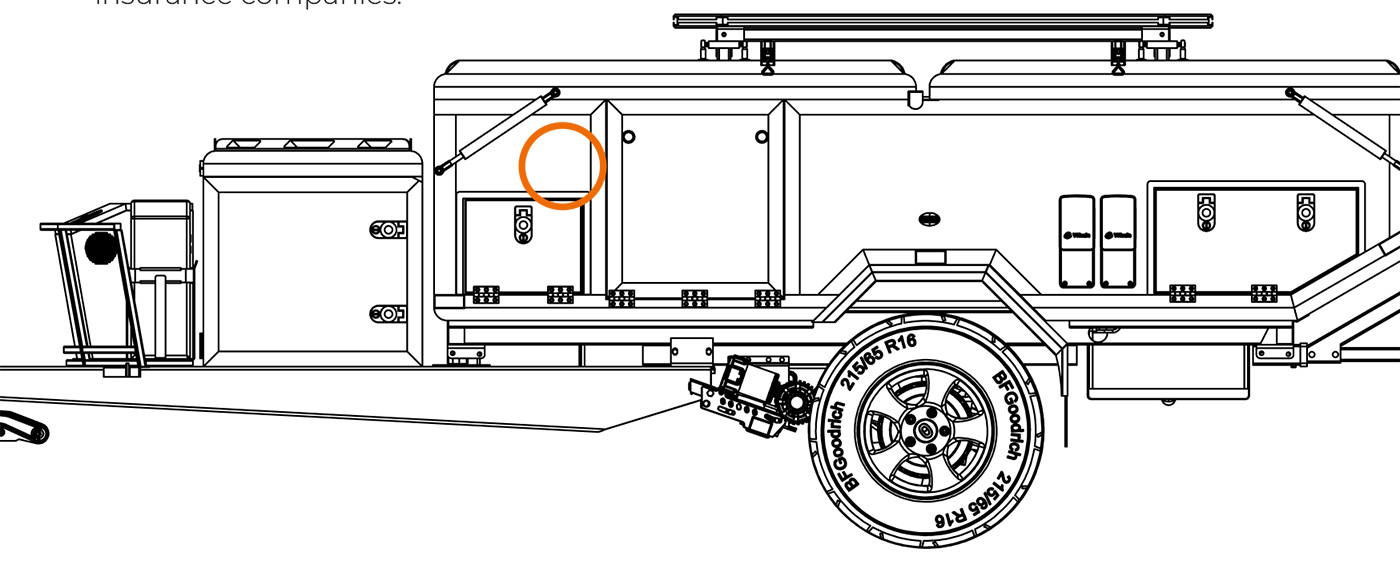
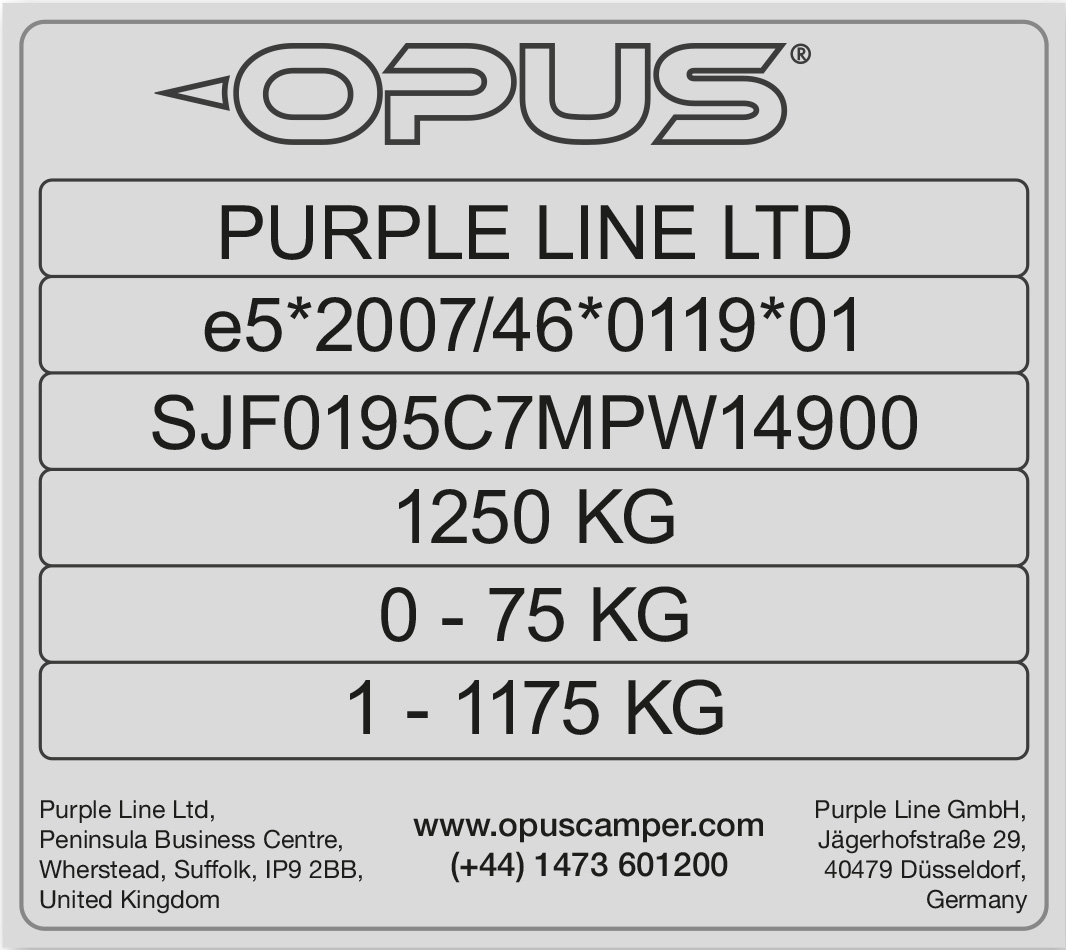
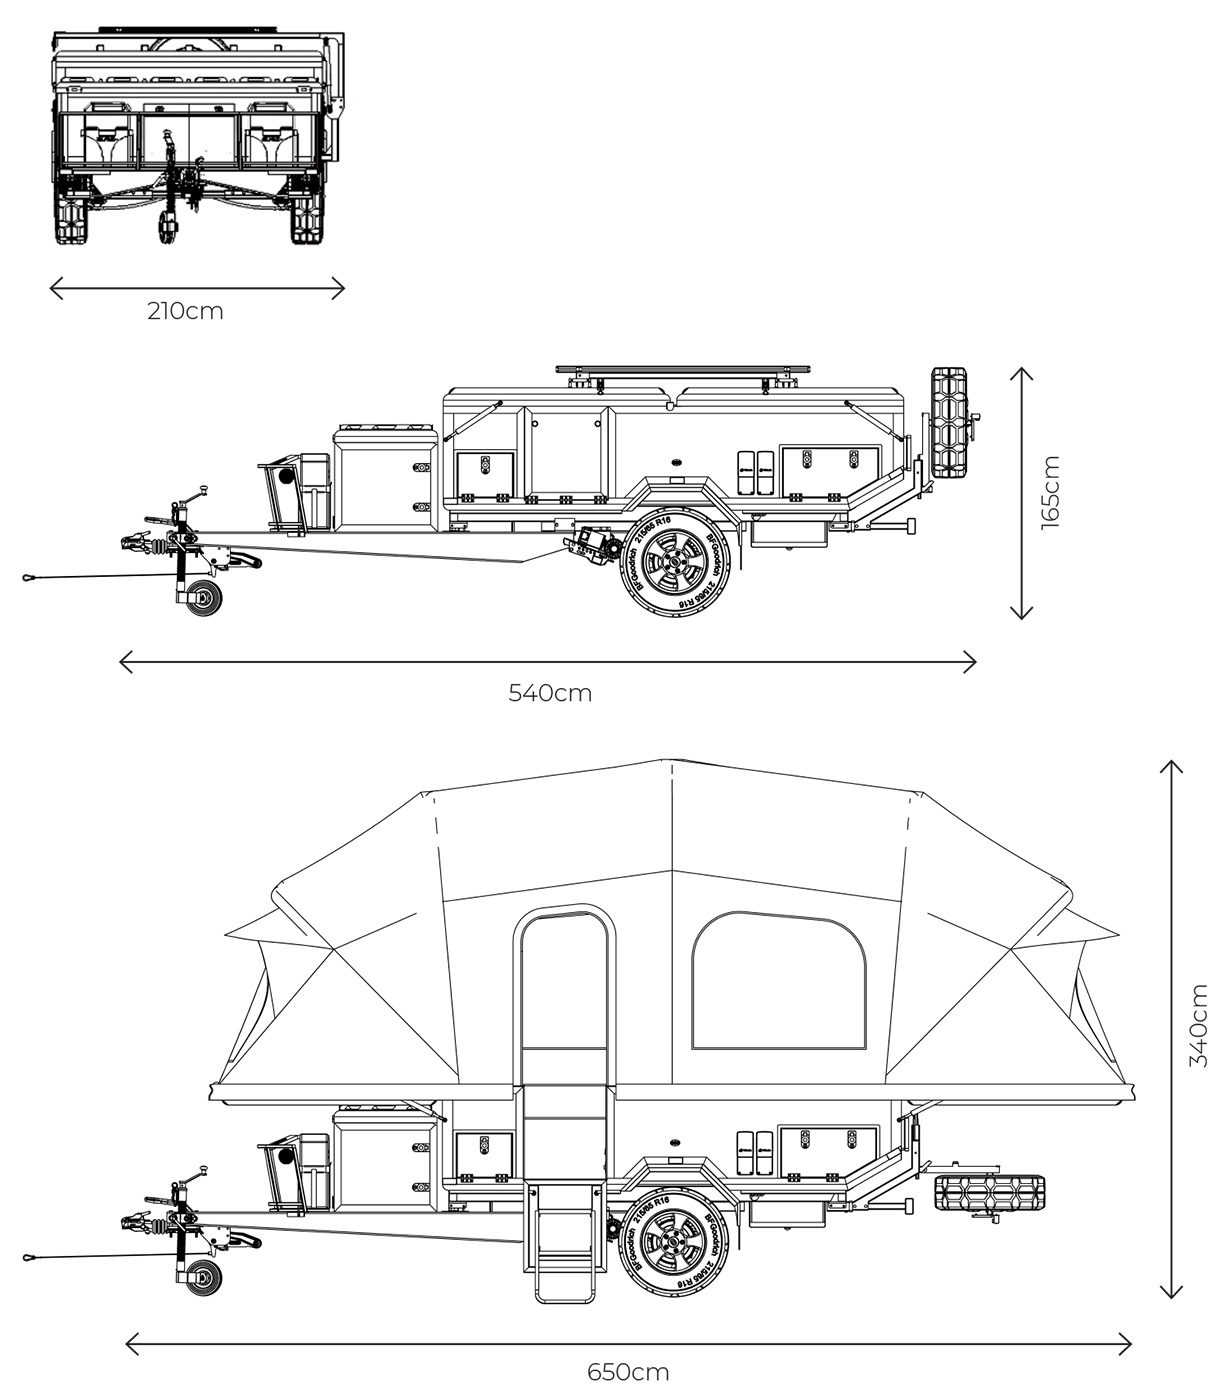
Every OPUS® has a Vehicle Identification Number (VIN). The VIN Plate can be found on the exterior of your OPUS® to the left of the door. We recommend making a note of your VIN. This will be required by insurance companies.
| WEIGHTS | |
| MIRO (mass in running order) | 1400kg |
| MTPLM (Maximum Technical Permissible Laden Mass) | Refer to VIN plate |
| MTPLM – 1400kg = User Payload |
* not for storage
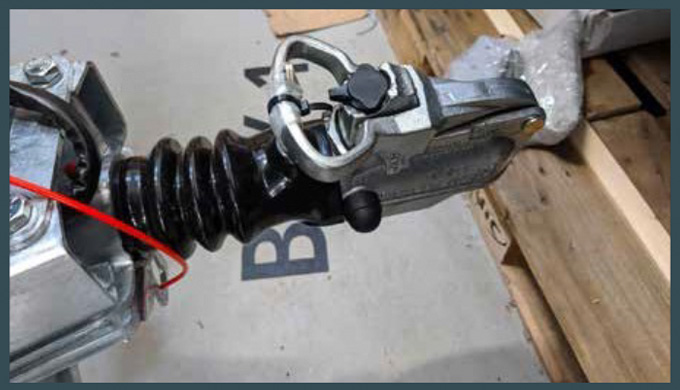
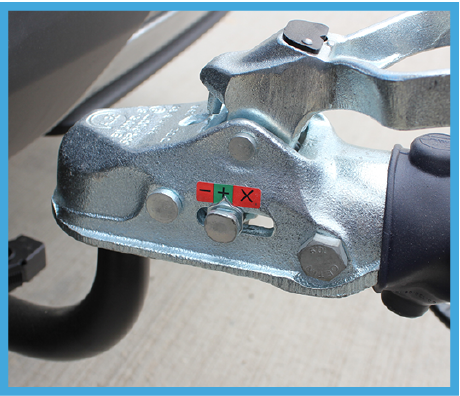
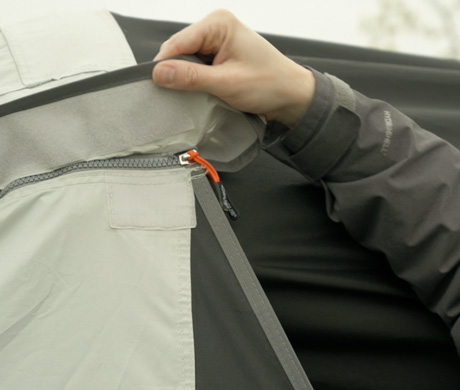
The OPUS® comes as standard with a pressed steel locking coupling suitable for all standard 50mm tow ball fittings.
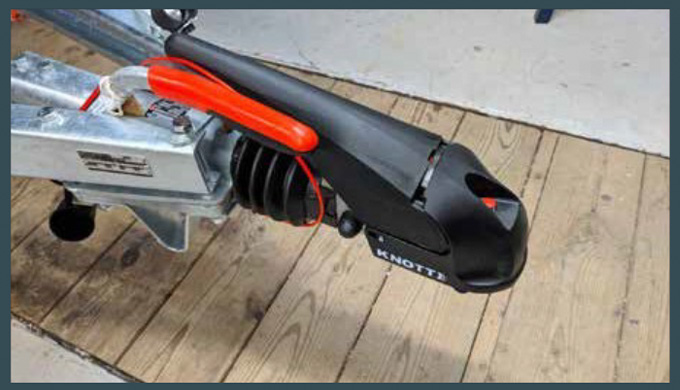
 STANDARD LOCKING COUPLING
 iSC/WS3000 STABILIZER COUPLING
If your OPUS® Camper has the optional stabiliser hitching coupling then your tow vehicle should be fitted with either an extended neck flange tow ball or any form of detachable ‘swan-neck’ tow ball would be suitable.
If you have a locking coupling it must be unlocked in transit to enable hitching and unhitching of the Camper.
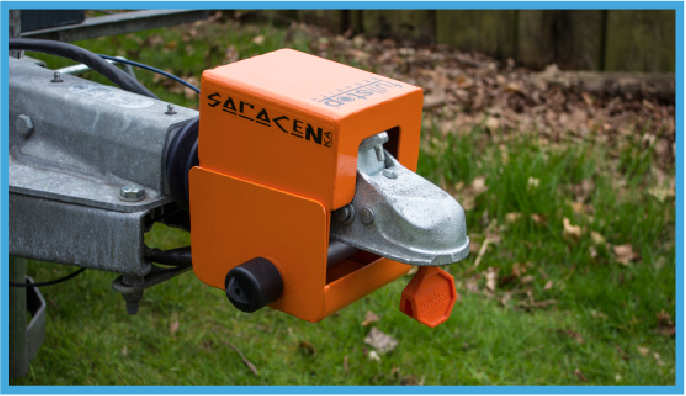
The Full Stop Saracen Hitch Lock (optional extra) will provide additional security to your
Camper, (compatible with standard coupling only). A Knott lock is available for the KS30 stabiliser coupling.
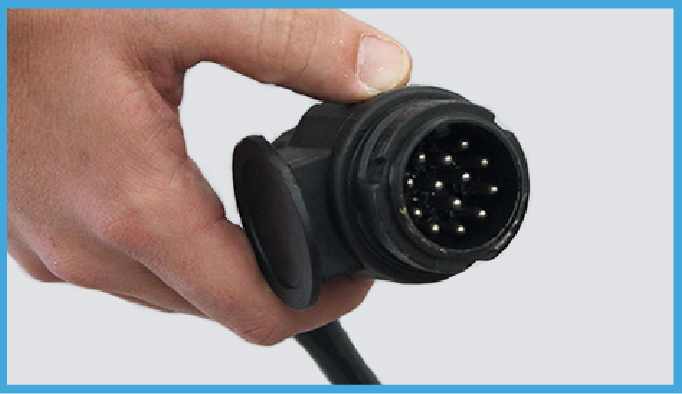
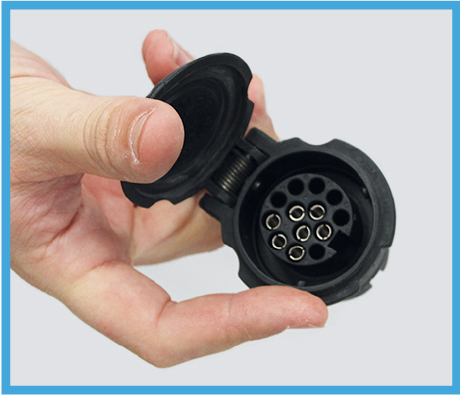
The OPUS® is fitted with a 13-pin plug that connects all the exterior trailer lighting as well as the connections that enable the leisure battery of the OPUS® to be charged by your vehicle whilst in transit. This connection also allows the fridge (optional extra) to operate a cooling function whilst towing using the 12v socket in the cupboard directly underneath the fridge, which is wired directly to the 13-pin plug, bypassing the Camper’s 12v electrical circuit.
A standard black 7-pin socket on your tow vehicle will be suitable to operate the essential running lights by using an adapter (not supplied) that converts the 13-pin plug into a 7-pin type.
However to utilise the features of the 13-pin plug then your vehicle should be fitted with ‘twin’ electrics. These comprise of a black 7-pin and a grey 7-pin socket; an adapter will be required that connects the 13-pin plug of the OPUS® to the twin sockets on your vehicle. Of course, your vehicle may already have one single 13-pin socket that does not require any form of adapter and is the ideal method of connection.
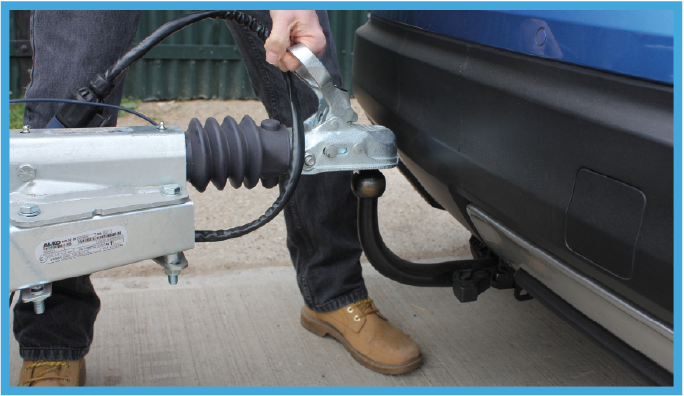
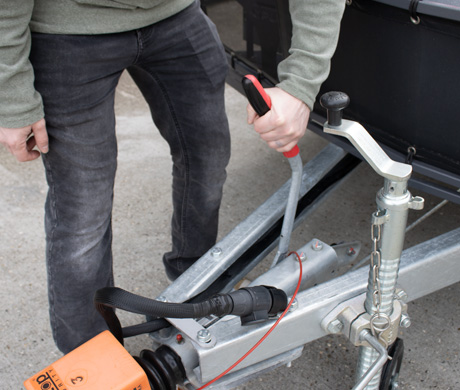
1. When hitching the OPUS® Camper to your vehicle’s tow ball you must ensure that someone is close to the handbrake in order to maintain control of the trailer, particularly when manoeuvring on a slope.
If you have a locking coupling the coupling will need to be unlocked and the security ball removed (not provided) to perform the step above.
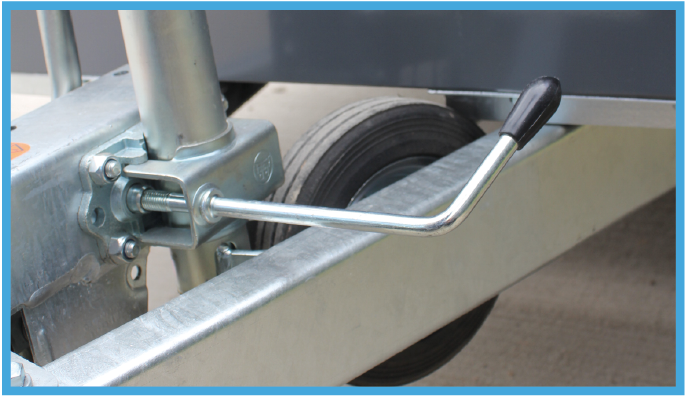
2. Steadily guide the coupling of the OPUS® to the vehicle’s tow ball. If necessary, raise the front of the OPUS® so that the coupling is higher than the tow ball by turning the handle on the jockey wheel.
Please refer to the separate guide to the jockey wheel fitted to your OPUS® for safe and correct usage.
The frame of the Camper is designed to aid pushing/handling of the trailer comfortably. THE STONE GUARD SHOULD NOT BE USED TO PUSH, PULL OR DIRECT THE OPUS.
3. Position the coupling over the tow ball and lower it by turning the jockey wheel handle and, at the same time lifting the coupling handle up. When fully engaged onto the ball you will be able to release the coupling handle.
If your trailer is fitted with a stabiliser coupling ensure the handle is engaged into the correct position to use the stabilising feature. The tow ball may also need to be inspected to ensure the stabiliser pad has an adequate grip on the tow ball.
FULL INSTRUCTIONS ON THE COUPLING ARE SUPPLIED IN A SEPARATE
MANUAL; PLEASE REFERENCE THE CORRECT AND SAFE USE AND RETAIN FOR FUTURE REFERENCE.
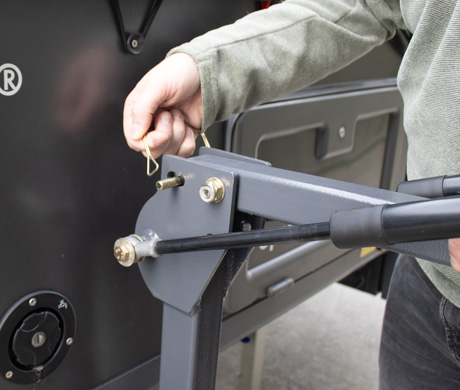
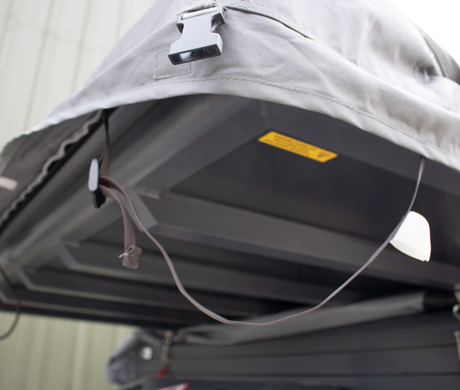
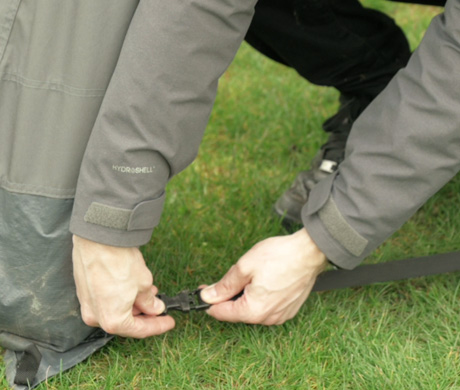
4. Fit the breakaway cable around the neck of the tow ball or through a suitable aperture on the tow bar itself. Ensure it doesn’t foul on the coupling or any other nearby objects such as the trailer lighting cable.
5. Raise the jockey wheel by turning the handle on the top until the wheel engages into the cut grooves on either side of the tube and make sure the wheel is fully tightened. Failure to do this may cause the wheel to retract in transit.
6. Loosen the jockey wheel clamp by turning the handle anti-clockwise and pull the jockey wheel up to provide the maximum ground clearance ensuring the wheel is pointing towards the rear of the OPUS®. Tighten the jockey wheel clamp. Engage locking pin to prevent movement of the jockey wheel during transit.
7. Connect the 13-pin plug into the socket (using an adapter if required) on your tow vehicle. Release the handbrake if still engaged.
8. Before any journey you must check that all the trailer lights are functioning correctly. Check front marker, side, brake, reverse and warning lights as well as both directional indicators.
Engage the handbrake. Release and secure the jockey wheel and tube to a lower position, wind the jockey wheel down until it touches the floor and starts to support the weight of the Camper. Some weight relief on the tow ball will be observed. The handle of the coupling can be lifted to release the coupling from the tow ball. Continue to wind the jockey wheel until the coupling is clear of the tow ball. Then disconnect the 13-pin plug and the breakaway cable.
When you are ready disengage the handbrake; the trailer can now be manoeuvred separately from the tow vehicle.
It is the responsibility of the driver of the tow vehicle to ensure that any loads, such as bicycles, roof boxes, kayaks, etc. are suitably secure prior to transit.
The Maximum Technically Permissible Laden Mass (MTPLM) must not be exceeded under any circumstances.
Items loaded onto the top of the OPUS® should be mounted so that the heaviest items are towards the front of the Camper.
If only one set of roof bars are installed then the load should be situated on the front bed tray lid, where possible. If a roof box is fitted it should be mounted on the rear bed tray lid so that it can remain in position when the camper is opened out. Ensure that the weight and balance of the trailer loading is maintained when using a roof box on the rear of the trailer to avoid adverse effects on the handling of the trailer. Always ensure you do not exceed the maximum loading capacity of any carrier, roof box or the roof bars. Further information can be found in the Roof Load Carrying section
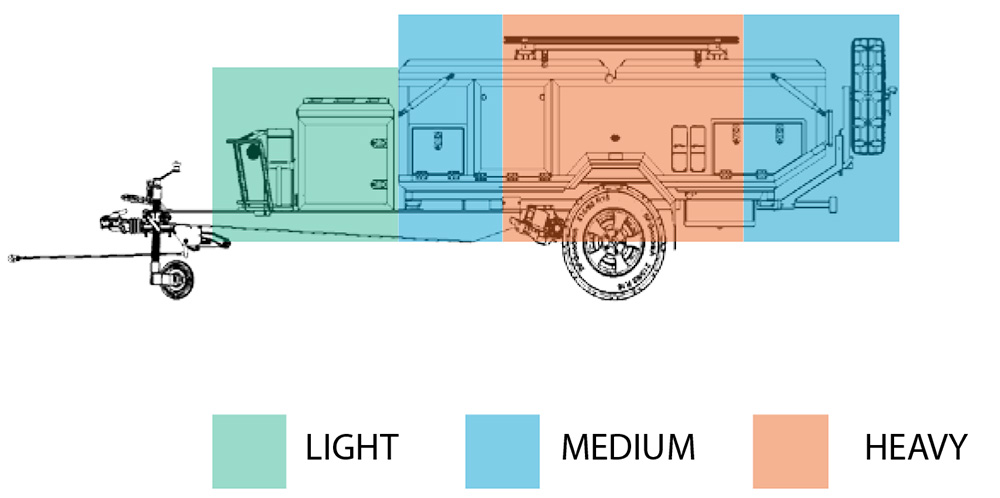
If only one set of roof bars are installed then the load should be situated on the front bed tray lid, where possible. If a roof box is fitted it should be mounted on the rear bed tray lid so that it can remain in position when the camper is opened out. Ensure that the weight and balance of the trailer loading is maintained when using a roof box on the rear of the trailer to avoid adverse effect on the handling of the trailer. Always ensure you do not exceed the maximum loading capacity of any carrier, roof box or the roof bars. Further information can be found in the Roof Load Carrying section.
The driver of the tow vehicle must ensure that their Driving Licence is valid for towing the OPUS® Camper. Please refer to the following website address for reference: www.gov.uk/towing-with-car
It is highly recommended, particularly if you are not experienced in towing that you adhere to any applicable laws for the country in which you are driving. Many guides are available from leading associations and should be studied before you embark:


The AA
Try to choose a site that is relatively flat. Avoid sites where the land may flood or where water will run down. DO NOT pitch directly under trees. Pitching near a hedge or wall may provide shelter against wind.
1. Once you have your OPUS® in position make sure the handbrake is securely on.
DO NOT ENTER THE OPUS® UNTIL THE CORNER STEADIES HAVE BEEN LOWERED INTO THE CORRECT POSITION.
 ENGAGE HANDBRAKE
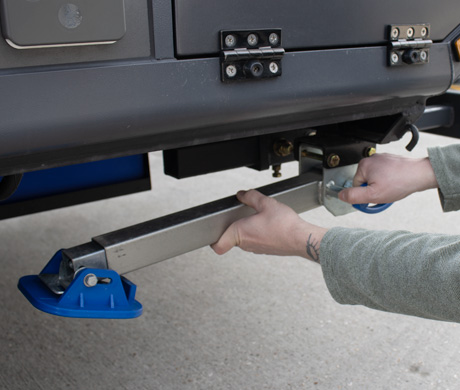 RELEASE BLUE HANDLE TO LOWER STEADY
 WIND CORNER STEADY TO GROUND LEVEL
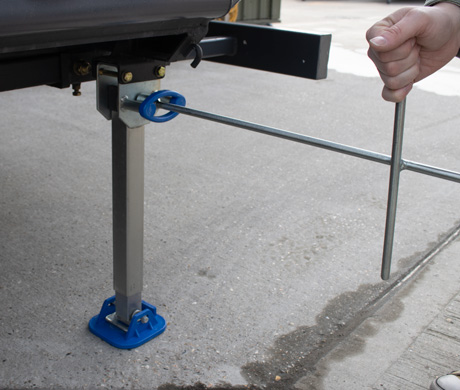
2. Use the jockey wheel handle to raise or lower the jockey wheel to level the ORX lengthways.
3. Once satisfied that the OPUS® is level, you will need to lower the corner steadies. Pull out the blue spring-loaded handle on the corner steady to retract the locating pins and release the corner steady. Use one hand to support the corner steady and carefully lower it until it locks into a vertical position. Using the included 19mm wrench, wind the corner steady down until the blue foot is pressed firmly onto the ground and there is resistence when winding. Repeat for all four corner steadies.
If ground is too wet and the corner steady sinks, move to drier ground.
If relocating the OPUS® ORX in-situ, it’s important to make sure that the corner steadies are properly raised. Failure to do so can result in damage to the locating pins.
 RELEASE THE SPARE WHEEL
 LOWER SPARE WHEEL
 REST BED LEGS ON THE GROUND
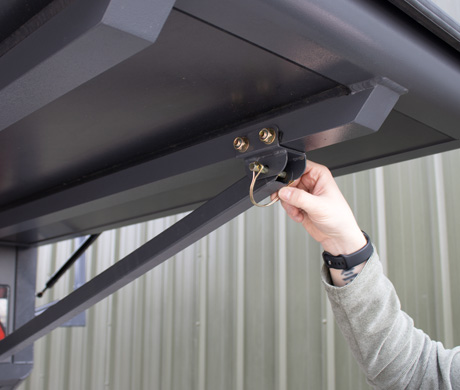
4. Lower the spare wheel carrier by retracting and rotating the spring-loaded bolts to secure them open. When the second bolt is open, the wheel carrier is free to drop. Take the weight and carefully lower it until it’s rested against the trailer frame. Swing out the two bed support posts from behind the spare wheel carrier and rest them on the ground for now.
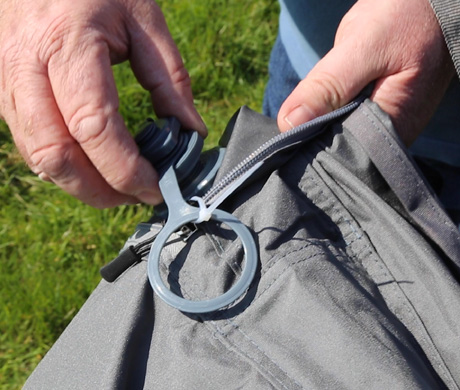
5. The next step is to open the kayak carrier. Remove the two D-pins from the securing latches on the entry-side of the ORX. Place these in a safe place. Open the two securing latches and allow the kayak carrier to sit in place. Remove the two securing pins from the kayak carrier hinges on the other side of the ORX. Raise the kayak carrier into its vertical position, then replace the two securing pins to lock the carrier in position and prevent movement.
 REMOVE D-PINS
 UNCLIP D-PINS
 KAYAK CARRIER D-PINS
FURTHER SETUP STEPS REQUIRE THE OWNER TO WORK AROUND THE KAYAK CARRIER IN ITS RAISED STATE. BE VERY CAREFUL NOT TO HIT YOUR HEAD. THE KAYAK CARRIER IS BIG, HEAVY AND MADE OF METAL, SO IT WILL HURT A LOT.
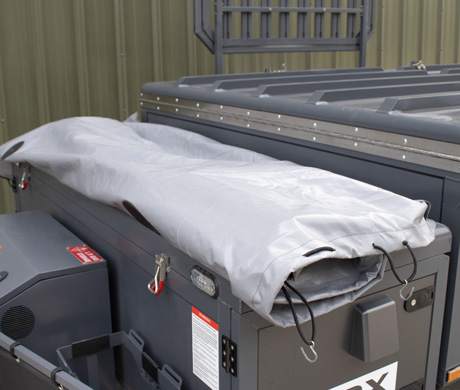
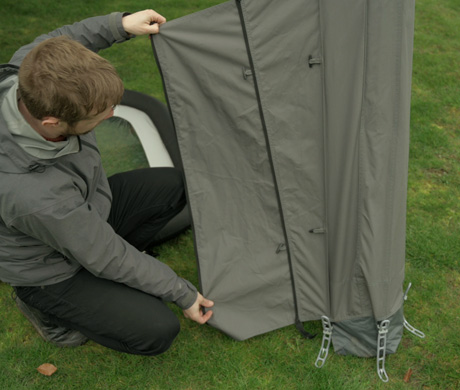
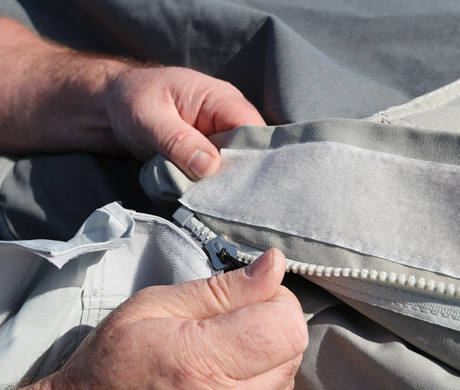
Remove the waterproof cover by unhooking the cover from around the ORX – there are two bungee cords at the back, three down each side, and an S-hook at each corner. It can be left attached at the front, by the storage locker. Detach the cover from the two securing latches on the entry-side of the ORX. Roll the cover back from the rear of the ORX towards the front. It can be safely stored on top of the storage locker as long as the front latches are accessible and not pinching the cover.
 UNHOOK COVER
 UNHOOK BUNGEE
 ROLL COVER ON TOP OF STORAGE LOCKER
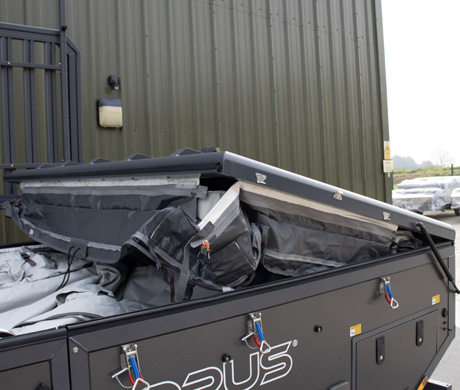
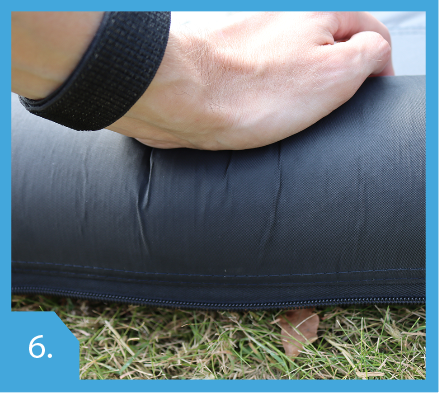
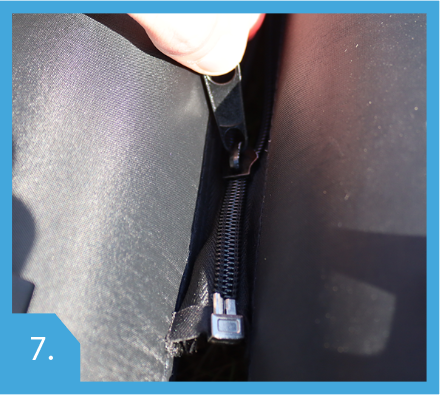
The next step is to open the trailer lids. Remove the D-pins from the securing latches. Put these in a safe place. Open the seven (7) securing latches holding the trailer lids in place. Open the front, hitch-end lid first, then the rear lid, as there is an overlap to aid with waterproofing. With the rear lid all the way open, lift the bed support posts, align them with the brackets on the lid and secure them using the D-pins. With the front lid all the way open, secure it in place with the two securing latches.
 OPEN LID LATCHES
 OPEN LIDS
 LIFT BED SUPPORT POSTS
 SECURE D-PINS
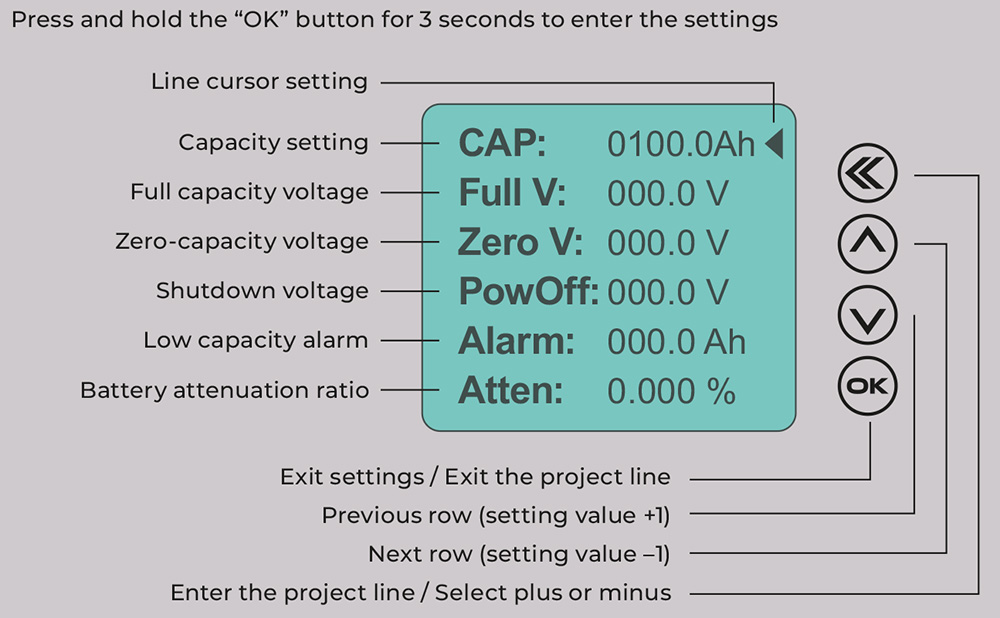
You can change the settings on this control to include alarms if the capacity of the battery falls below the desired charge. The capacity settings have already been included during the installation of the camper depending on the battery you have chosen. However, if you purchase a larger capacity battery you will need to change the settings on the control panel to show a more accurate reading. An example of how the control panel works is shown below

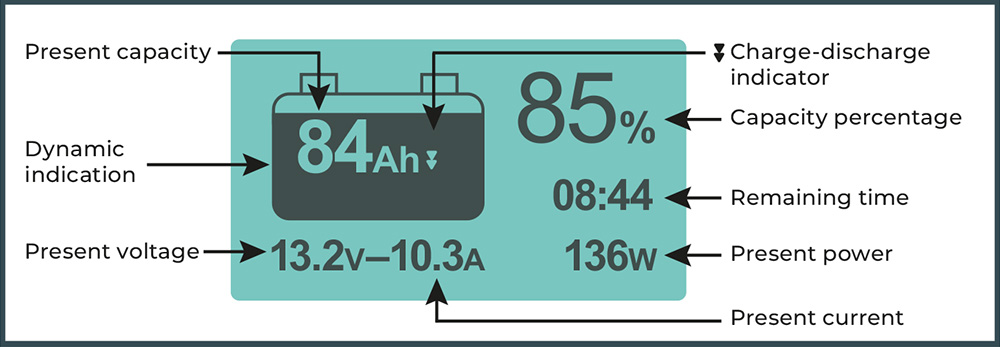
How to access the control panel settings:
To access the settings on your control panel, simply follow the steps below:
1. Press and hold the ‘OK’ button for 3 seconds. This will bring up the settings page as shown below.
2. Now simply navigate and change the required settings, such as capacity etc.
3. Once you are happy with the settings simply press and hold the ‘OK’ button to exit the settings menu
4. If you know the capacity of your battery is fully charged go ahead and press and hold the ‘UP’ Button. This will set the battery value to 100%
5. If you know the battery is low or 0. Do the opposite of the following instruction and press and hold the ‘DOWN’ button to set the battery to Empty
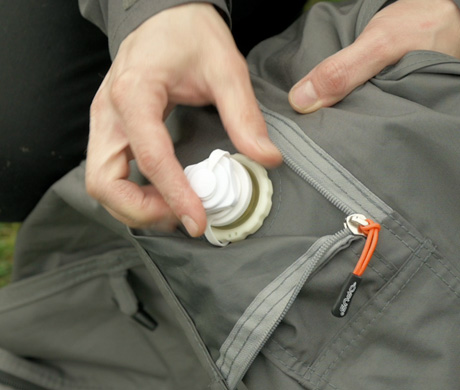
PLEASE ENSURE THE AIR TENT DOOR AND WINDOWS ARE CLOSED BEFORE TENSIONING THE TENT.
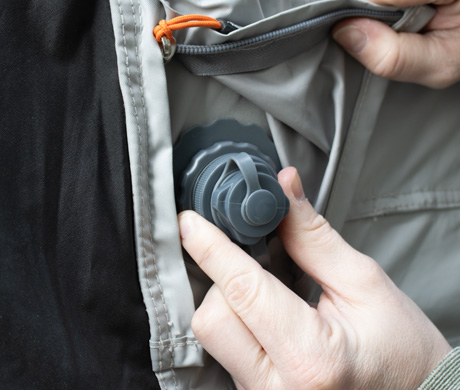
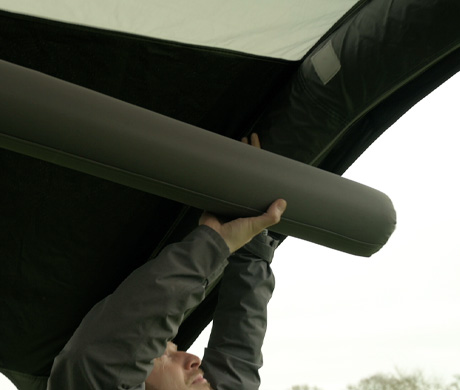
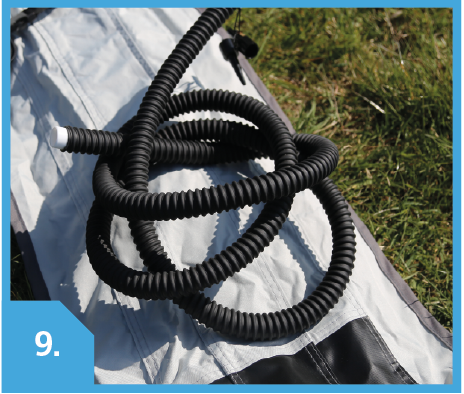
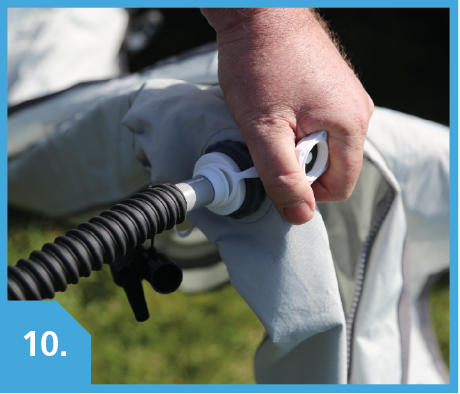
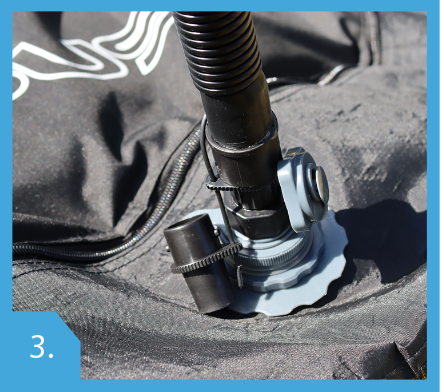
1. Close all five (5) of the air valves around the edge of the tent. Do this by screwing the plug into the valve until it’s finger-tight. Do not attempt to unscrew or tighten the valve collar.
2. Insert black inflation hose into white main air valve until tight.
3. Start inflation. Open battery meter panel cover to access the control panel. Turn the power on (button 1). Make sure the AIR button is illuminated (button 2). Press the pump button (button 3) to begin inflation

YOUR PUMP IS SET TO INFLATE ONLY. DO NOT TAMPER WITH THE PUMP AND DO NOT ATTEMPT TO USE THE PUMP TO DEFLATE YOUR OPUS® ORX.
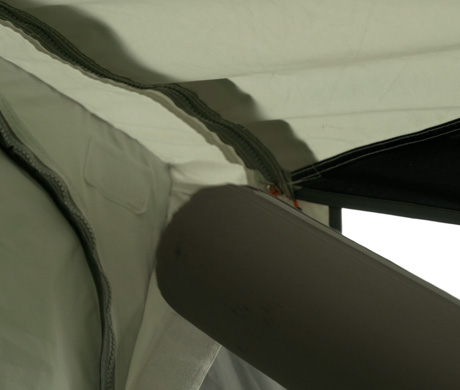
4 .During inflation, make sure the tent corners are secure. Pull the fabric of the tent corner down to firmly secure over the corner of the trailer lid. Make sure the corner strap is passed beneath the corner of the trailer lid and tighten to secure. Repeat for all four corners.
Keep an eye on the corners during inflation in case the material shifts position. If left until after inflation, the material will potentially be too stiff to relocate onto
the corners.
When the tent reaches maximum inflation (8 PSI), the pump will automatically stop
54. Remove black inflation hose from white main air valve.
FAILURE TO DO THIS MAY RESULT IN DEFLATION OF THE TENT DURING USE AND POTENTIAL DAMAGE TO THE WHITE MAIN AIR VALVE.
6. Remove the internal items of your OPUS and lay outside in a suitable area, in
order to gain access to the inner bed tents, or facilitate the roof lining fitting or
adjustment of roof windows or blinds.
7. (If applicable) Attach inner bed tents to the internal fixings at both bed ends.
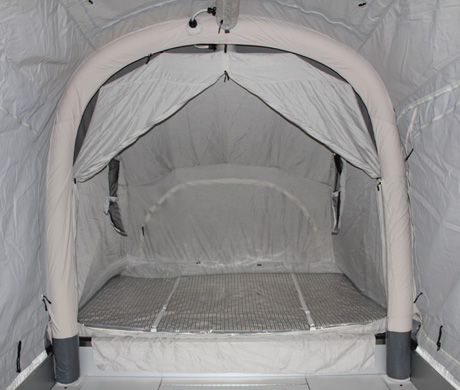
8. (If applicable) Install LED lighting into zipped PVC pockets on AIR tent roof beam, route cabling through AIR pole sleeving down to socket and connect. Once installed the LED lighting can stay fitted permanently, but it must be disconnected from the socket before pack down
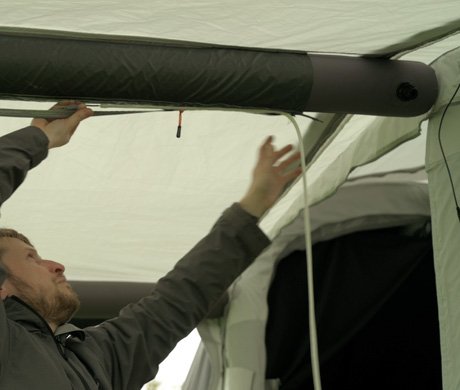
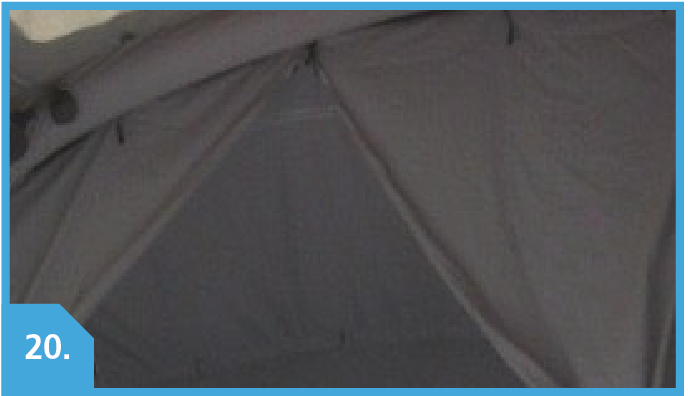
9. Walking around the Camper the elastic bungee that is within the tent can now be fitted over each gas strut. The tent should now be fully tensioned.
10. OPUS ORX also comes with additional draft excluders which attach underneath the gas strut hooks.
PLEASE ENSURE THAT YOU ROLL ALL SIDE WINDOWS, ROOF WINDOWS AND DOORS SO THAT THE INTERIOR SIDE OF THE MATERIAL IS NOT EXPOSED I.E ROLL THE FABRIC INWARDS. YOUR FABRIC HAS A COATING ON THE INTERIOR WHICH MAY BE DAMAGED OR CHANGE COLOUR IF EXPOSED TO UV FOR A PERIOD OF TIME.

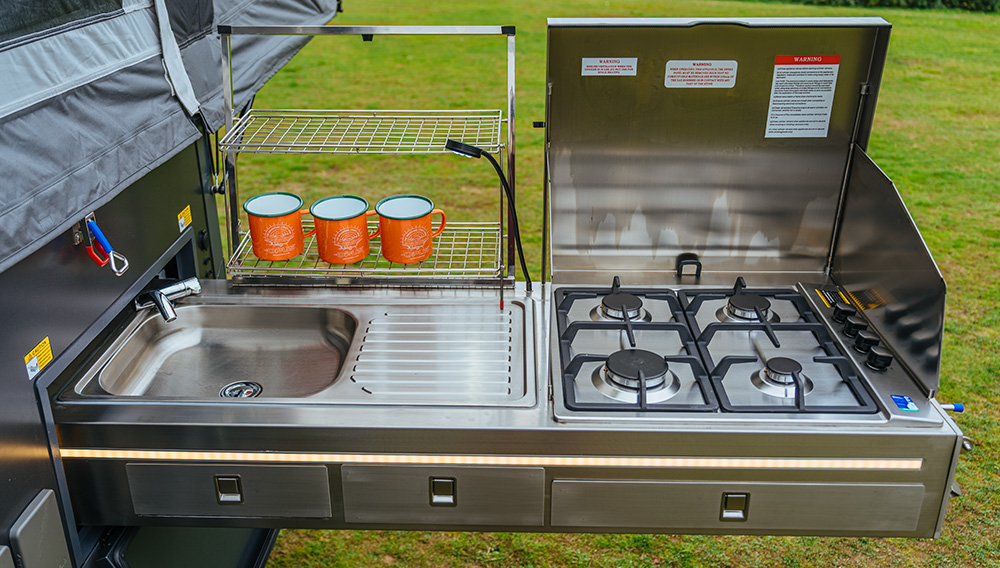
1. The OPUS® ORX comes with a large 4-burner pull out kitchen. This is located at the rear entry side of the camper. Use the two push locks to open the door and carefully rest the it against the frame of the chassis.
2. The kitchen is secured for transport with two spring-loaded bolts. Release these and latch into position. Use the large handle to gently pull the kitchen unit out of the camper until it stops. Pulling the kitchen too fast or too hard can lead to damage of the runners.
3. With the kitchen in place, release the latch on the support legs and support them as they swing down. Make sure they’re vertical and loosen the wingnuts to extend the legs until they’re resting on the ground. Tighten the wingnuts by hand to secure in place.
4. Open the lid covering the gas hobs and move the wind guards into place if needed. Raise the shelves/drying rack into position.
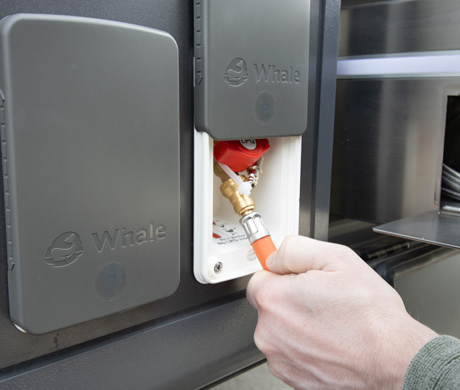
5. To use the gas hob, it must be connected to the gas supply.
Open the left-hand drawer-front in the kitchen unit and pull out the end of the orange gas line. Open the external gas port (number 11 on page 6). Attach the gas line and open the tap.
The burners can be operated by turning the corresponding control knob and pressing it down to trigger the ignition unit
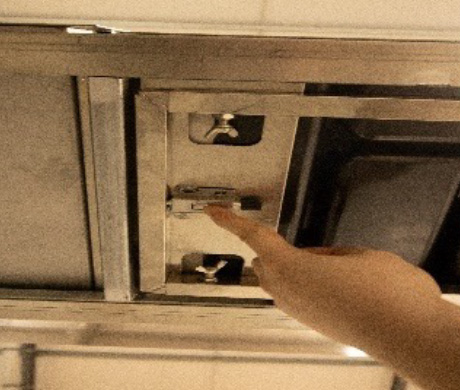
During first use after connecting to gas supply, it will take a little time for gas to travel to the hob.
6. Before using the sink, the waste pipe must be in place. It’s located underneath the sink at the back of the unit.
Pull the waste pipe out of the unit and extend it downwards. Run it into the waste water tank. Make sure the water system is setup and turned on before using the sink.
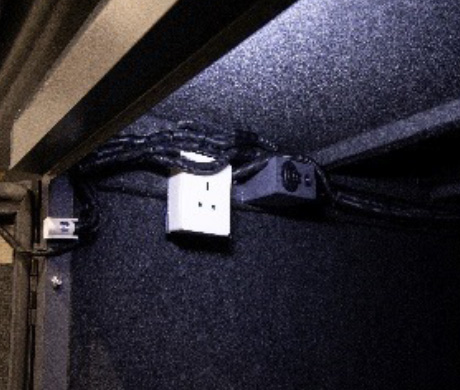
7. If not already done so, position the fridge inside the storage box area. A socket cover aperture is provided in order to feed the mains and 12v cables/plugs through into the base unit. Plug the 3-pin mains plug into the mains socket provided in the unit, this can be accessed from the lift-top locker door.
When packing the kitchen down, make sure that the gas hose is disconnected and stowed away and that the waste water hose is collapsed and stowed. Failure to do this may lead to these components being damaged.
FOR SAFETY REASONS THE GAS HOSE CANNOT BE DISCONNECTED FROM THE GAS VALVE WHILST THE GAS SUPPLY IS STILL TURNED ON.
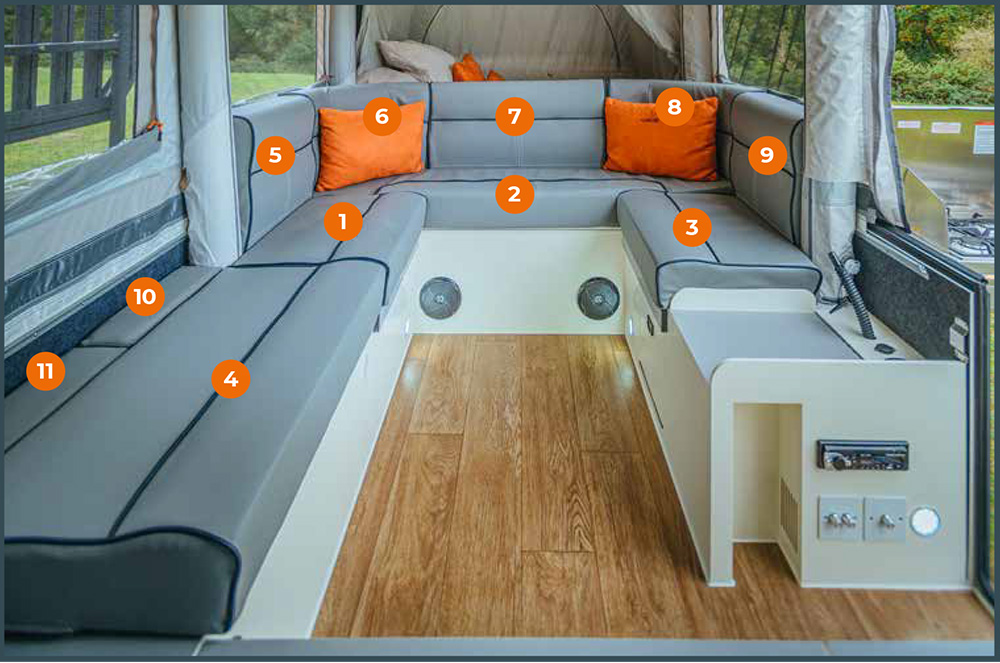
1. Locate all seat cushions, and then locate the Velcro fitted to each type of back cushion to help you understand where each cushion goes.
2. The four seat bases are positioned as above (cushion numbers 1-4). Cushion 4 is a ‘floating’ cushion and can be used where desired.
3. Fit the centre back cushion (number 7).
4. The corner cushions can now be positioned and attached to the rear seat back with the Velcro (cushion numbers 6 & 8).
5. The other two seat backs should be placed at their respective sides with the Velcro
sides facing towards the rest of the cushions (rear of the Camper) and attached to the corner cushions (numbers 5 & 9).
6. The two bolsters (numbers 10 & 11) can be placed behind cushion 4.
The main set-up of the Camper is now complete. The water, gas and electric systems sections detail the use and function of the individual components.
 THE REAR ORX BEDROOM CONVERTED INTO A KING-SIZE BED.
The ORX also comes with two extra cushions that can be used to convert the double bed at the rear of the camper into a king-size bed.
1. Position the extra two cushions between the seating cushions and the double mattress. Make sure the cutouts are positioned around the air beams
2. Rearrange the bedding so that the head-end is at the rear of the camper.
Refer to the Condensation and Ventilation sections.
IMPORTANT! A LEISURE BATTERY OR MAINS HOOK UP CONNECTION IS REQUIRED TO OPERATE THE WATER PUMP.
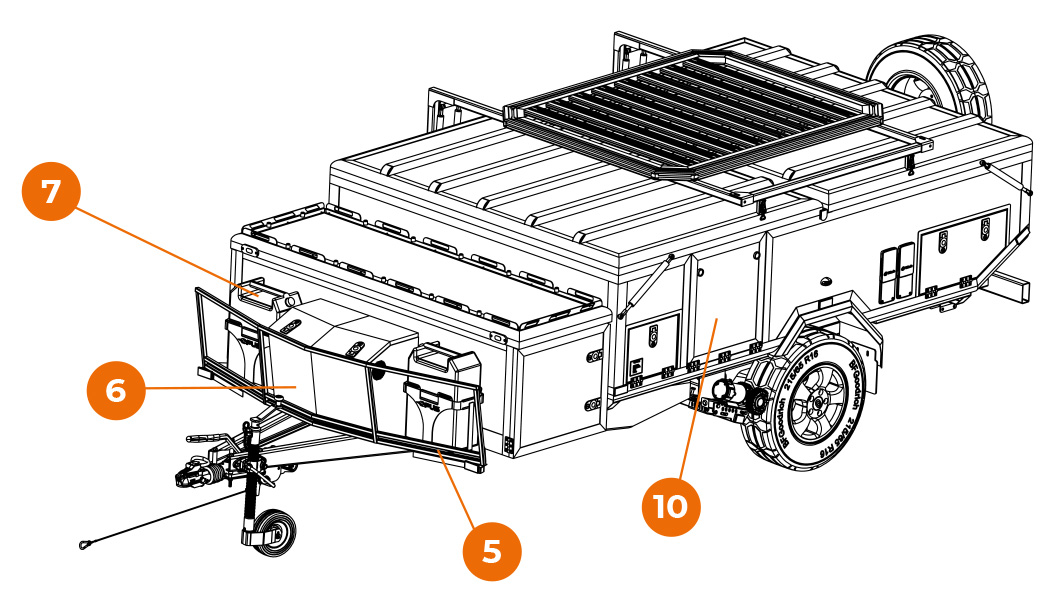
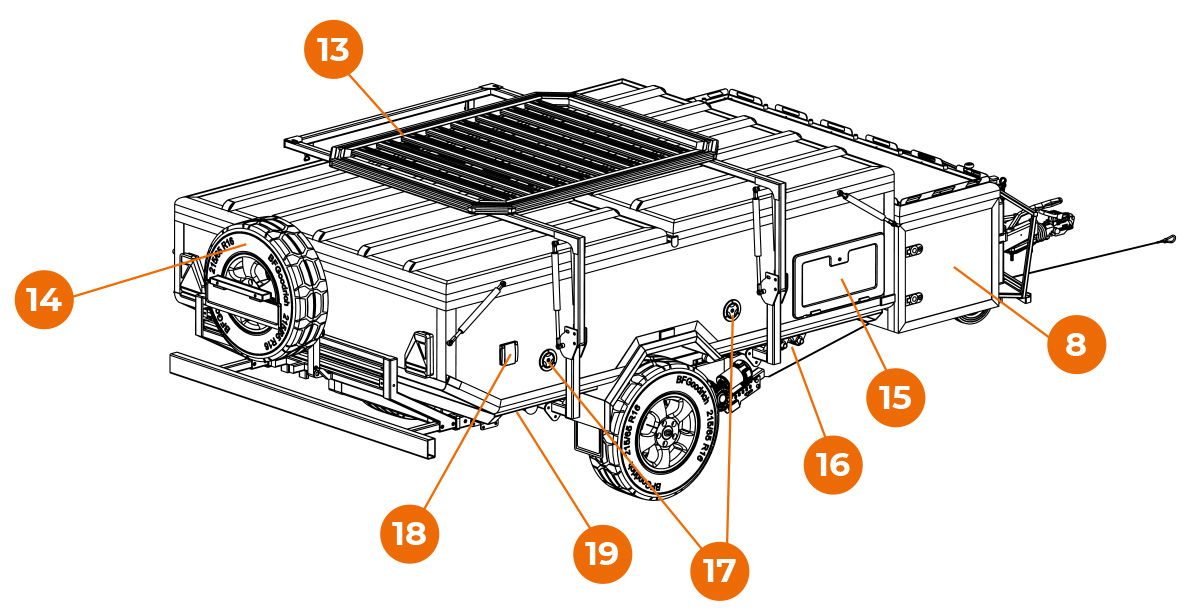
1. Before the water system can be set up, one or both of the onboard water tanks need filling. To do this, first open one or both of the caps located on the driver’s side of the trailer (No. 17 on page 7).
2. Put an absolute minimum of 8 litres of water in the tanks. You can put 8 litres in one tank or split the amount between the tanks.
3. Adjust the tank selector (No. 16 on page 7) according to which tank/s have been filled. The selector is located beneath the battery box and has three positions.
Select the middle position to draw from both tanks, the rear position to draw from the front tank, or the front position to draw from the rear tank.
IT’S ADVISED TO NOT FILL BOTH WATER TANKS WHEN IN TRANSIT AND FILL UP ON THE CAMPSITE IF POSSIBLE. FILLING BOTH WATER TANKS CAN DRAMATICALLY INCREASE THE OVERALL WEIGHT OF THE TRAILER. PLEASE CHECK THE NOSE AND TRAILER WEIGHT ACCORDINGLY TO ENSURE YOU ARE NOT OVERLOADING THE TRAILER.

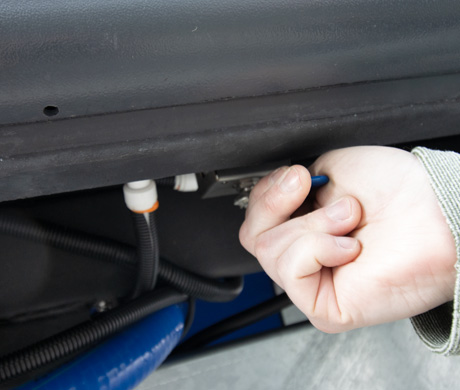
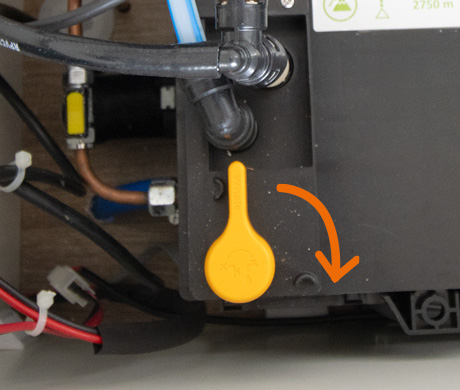
4. If you need hot water, make certain that the flow valve on the water heating unit is closed by putting the yellow lever at the 12 o’ clock position.
The water heating unit is located in the hot water tank cupboard beneath the bench seating inside the camper (No. 26). If the lever is set to the 3 o’ clock position, the unit will drain any water from the bottom of the camper.
The water heater will draw 8 litres of water when switched on, regardless of whether you need hot water or not
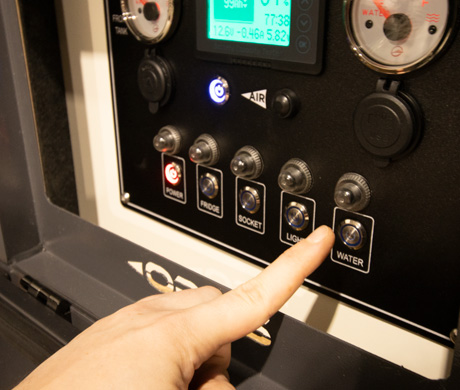
5. Turn the water pump on. To do this, first open the battery meter panel, if not already open (No.9).
Turn the power on, if not already on. Press the water button (button 7). The pump will switch on and fill the water heating unit; once the unit is full, it will stop automatically.
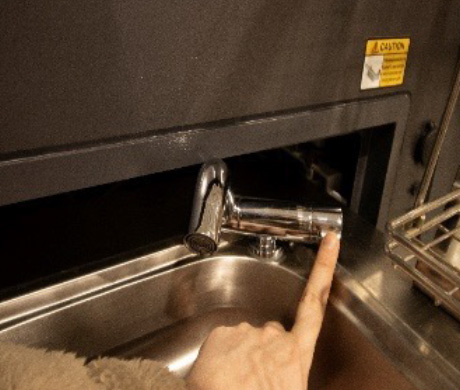
6. While the tank is filling, extend the concertina waste hose from beneath the sink in the kitchen unit (if not already extended) and run it into the waste water tank
7. The tap in the kitchen unit can now be used. On first use after setup, it may take a short time for water to flow while any air in the system is purged.
8. Select which method of heating the hot water you want to use – electricity or gas. Firstly, activate the water heating system. On the battery meter panel, make sure the ‘Socket’ button is switched on (button 5).
Open the electrical power cupboard (No. 25) and turn on the switch marked ‘Water Heater’. If the switch doesn’t light up, make sure the ‘Socket’ button on the battery meter panel is illuminated.
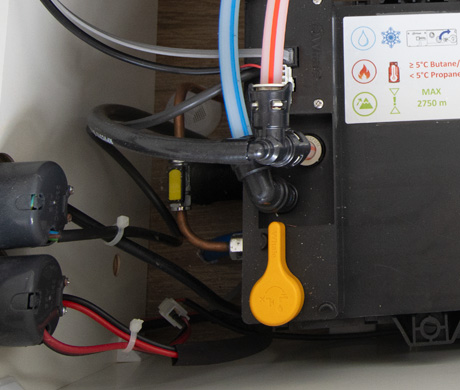
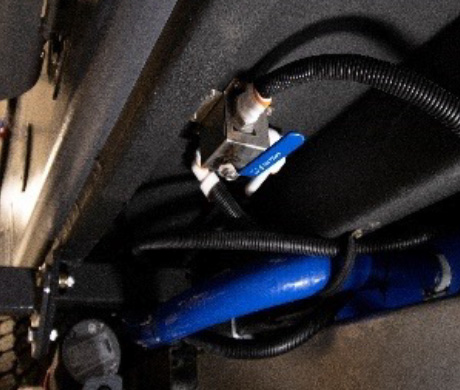
9. If using gas heating, make sure the yellow isolation valve next to the water heater is turned on (inline with the pipe).
Use the water heating control to switch between electric heating or gas heating and adjust the level of heating.
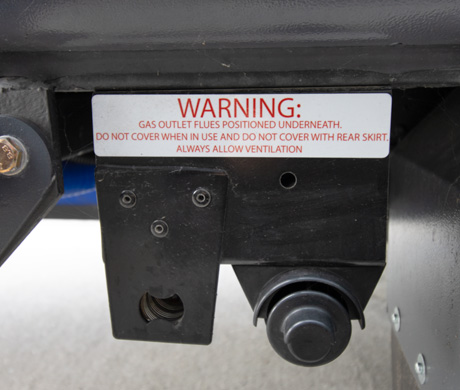
IF USING GAS TO POWER THE WHALE EXPANSE, IT IS CRITICAL THAT THE REAR OPUS SKIRT IS NEVER FITTED WHEN USING GAS AND THAT THE WINDOW IN YOUR OPUS ABOVE THE GAS FLUE OUTLET REMAINS CLOSED AT ALL TIMES.
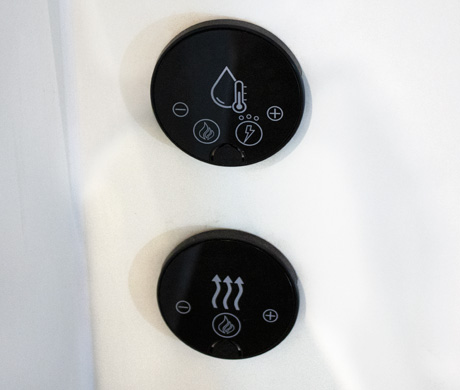
2. To wake the Whale Heat Control panel wave your hand in front of the control panel to light up/activate the panel for use – the control panel is touch screen.
3. Now select your desired water temperature by using the – and + buttons on the control panel.
4. There are 3 available temperature settings:
4A. Frost protection mode (approx 25°c)
4B. Eco mode (approx 55°c)
4C. Max temp mode (approx 72°c)
5. Now select and activate your heat method:
5A. For Gas press the ‘flame’ button (image) – the ‘flame’ icon will turn blue and the Whale Expanse will ignite the Gas, the ‘flame’ icon will then turn orange.
5B. For Electric press the ‘bolt’ button (image) – the ‘bolt’ icon will turn blue and the Whale Expanse will draw electricity. The ‘bolt’ icon will remain blue. When using electric input you have the additional option for 3 power settings. This can be useful if your campsite pitch has a limited electricity input or if you intend to use other electrical appliances inside your OPUS Camper whilst the hot water system is heating. There are 3 lights above the ‘bolt’ icon (image). By pressing and holding the ‘bolt’ icon you can switch between these 3 power settings
5Bi. 1 light – 1.6A/0.38kW
5Bii. 2 lights – 3.3A/0.75kW
5Biii. 3 lights – 6.5A/1.50kW
5C. Note: a lower power input will take longer to heat the water within the Whale Expanse water tank.
6. If you wish to use both Gas and Electric input perform both steps above for Gas and Electric input – so that both the ‘flame’ and ‘bolt’ icons are lit.
7. The Whale Expanse will now begin to heat the water – the progress can be followed by waving your hand over the control panel to display the current temperature by orange blocks.
8. Once the control panel display has reached your selected temperature the hot water is ready to use.
1. When packing away the OPUS® you must adhere to the following procedure in order to drain the system of any stored water in the tanks (if desired) and/or excess water in the pipes (do not yet disconnect the internal waste pipe).
1A. Switch off the pump at the main control panel.
1B. Open the sink tap and allow the excess water in the internal pipes to drain out of the waste hose. Close the sink tap afterwards and dry the sink with a cloth
1C. If you wish to empty one or both of the main water tanks – open the tap located underneath each – note these will empty immediately beneath the OPUS®
1D. To empty the Whale Expansion Tank – open the yellow lever to the 3 o’ clock position (Note: water will pour out directly underneath the OPUS until empty). Close valve to 12 o’ clock position on completion to prevent emptying when refilled at next use.
1E. Extend and drain the wastewater outlet hose and tuck back underneath the sink unit.
1F. Turn Whale Expanse Gas Isolation Valve off.
1G. Isolate both Heater (if fitted) and Water Pump switches in electric cupboard before tuning off all switches at mains control panel.
A small amount of water may be present from the connectors and waste hose, so a cloth is useful to remove any excess water.
 WATER TANK TAP
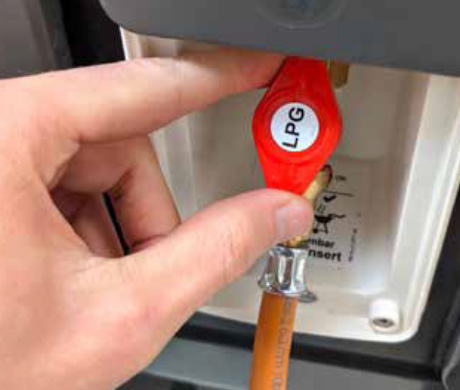
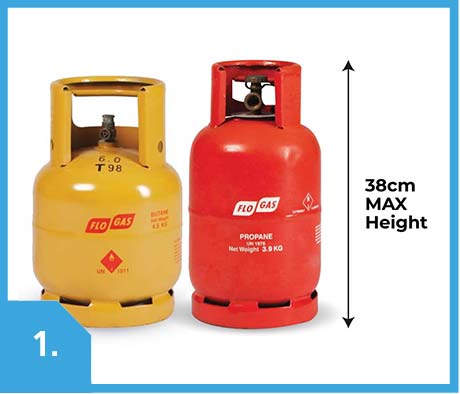
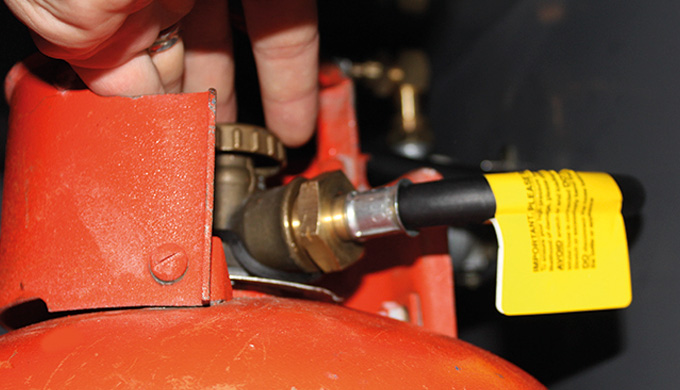
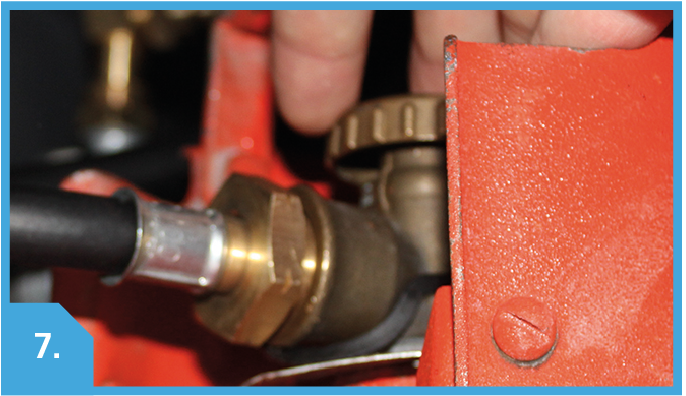
1. The OPUS® has the facility to carry 2 x 4.5kg Butane or 2 x 3.9kg Propane gas cylinders (not supplied) in the front gas locker compartment. The OPUS® is fitted with straps for two gas cylinders as standard.
2. A gas hose for your cylinder is already supplied. This will include a ‘Propane’ hose for UK mainland and a ‘Butane’ hose for outside of the UK as standard. Please ensure this is correct before attaching your cylinder.
3. First connect the gas hose onto the cylinder and then fit the other end of the hose onto the fixed gas regulator inlet ensuring the rubber gasket is in place. It is advisable to keep an adjustable spanner with jaw opening up to 30mm in the Camper for this use.
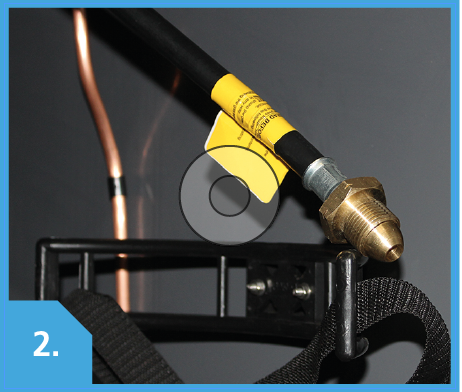
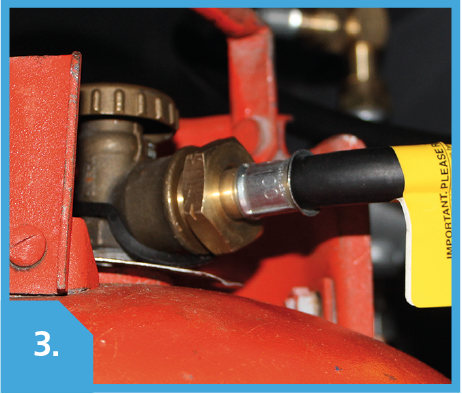
CHECK THE INSTRUCTIONS FOR CORRECT FITMENT AND SAFE USE WITH THE GAS CYLINDER MANUFACTURER/SUPPLIER.
ALWAYS ENSURE THAT THE GAS CYLINDER RETAINING STRAPS ARE FITTED WHENEVER A GAS CYLINDER IS INSTALLED IN THE FRONT LOCKER COMPARTMENT, EVEN WHEN THE OPUS® IS STATIONARY.
4. The gas tap/valve on the top of the gas bottle can now be opened.
SAFETY FIRST! ALWAYS KEEP THE LID CLOSED WHEN THE GAS HOB IS NOT IN
USE. ENSURE BURNERS ARE TURNED OFF WHEN NOT IN USE.
5. Ensure that the gas bottle valve is closed prior to packing up the OPUS® for transit
or storage.
See page 18 for how to set up the kitchen area.
IF AN AWNING IS FITTED, ALWAYS ENSURE THAT ONE OR MORE OF THE WINDOWS ARE OPENED TO ALLOW FOR ADEQUATE VENTILATION WHEN THE HOB IS IN USE.
THE GAS SYSTEM OF THE CAMPER IS DESIGNED FOR USE WITH THE GAS HOB ONLY; DO NOT USE ANY OTHER GAS APPLIANCE WITH IT.
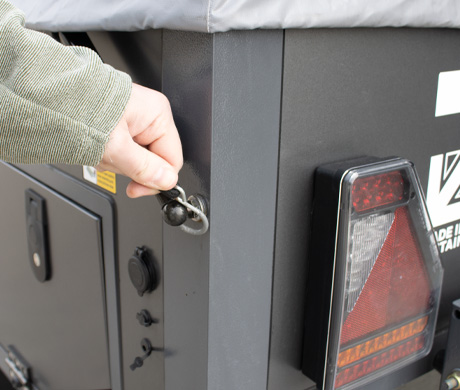
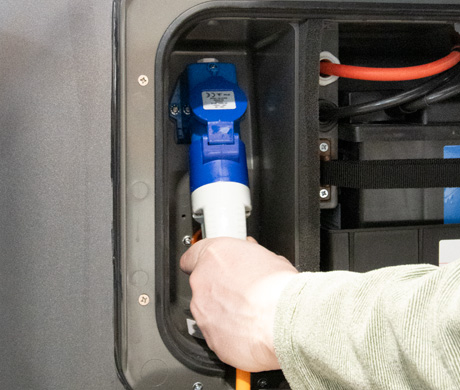
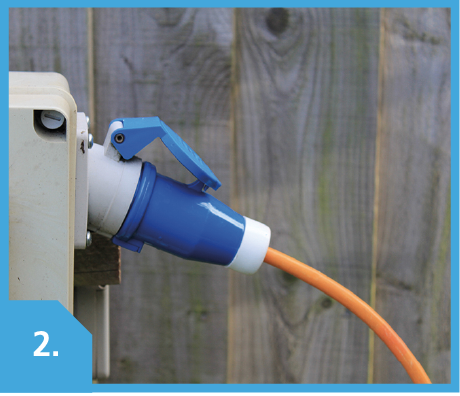
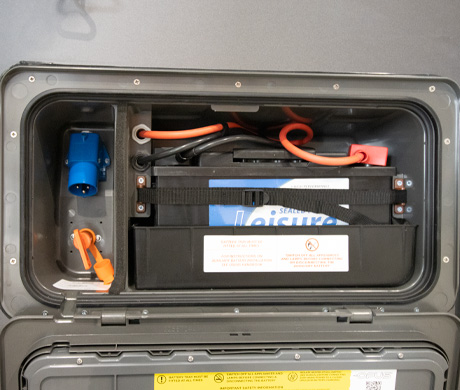
1. To connect the OPUS® to a 240v mains power supply, unlock the battery compartment door and plug in a suitable electric hook up extension cable. There is a recess in the bottom left-hand corner of the battery compartment to enable the door to be closed and locked, even when the cable is connected.
2. Once connected to a camping site supply or your home’s supply (via a mains 3-pin plug to a round socket adaptor), your OPUS® leisure battery will be charging (provided the MCB in the consumer unit are on).
3. To operate the 12v electrical systems (you must have a leisure battery) they must be switched on at the power switch in the control panel situated just inside the door of your OPUS® on the right hand side.

4. The internal 12v sockets (with the exception of the fridge 12v supply) the air pump and lighting will operate on 12v power from the leisure battery; heavy usage and power hungry appliances will deplete the battery’s charge. It is recommended to have the mains hook-up cable connected to a suitable supply if available, even if appliances are run on 12v only.
BATTERY USER GUIDANCE – BATTERY MANUFACTURERS STRONGLY ADVISE THAT A BATTERY BE RECHARGED AS SOON AS ITS CAPACITY FALLS BELOW 50% OF ITS FULLY CHARGED STATE. POWER SHOULD NOT BE DRAWN FROM A LEISURE BATTERY WHEN IT DROPS TO A COMPLETELY DISCHARGED STATE – 12V OR LESS. ALLOWING THIS TO HAPPEN MAKES IT VIRTUALLY IMPOSSIBLE TO FULLY CHARGE IT AGAIN.
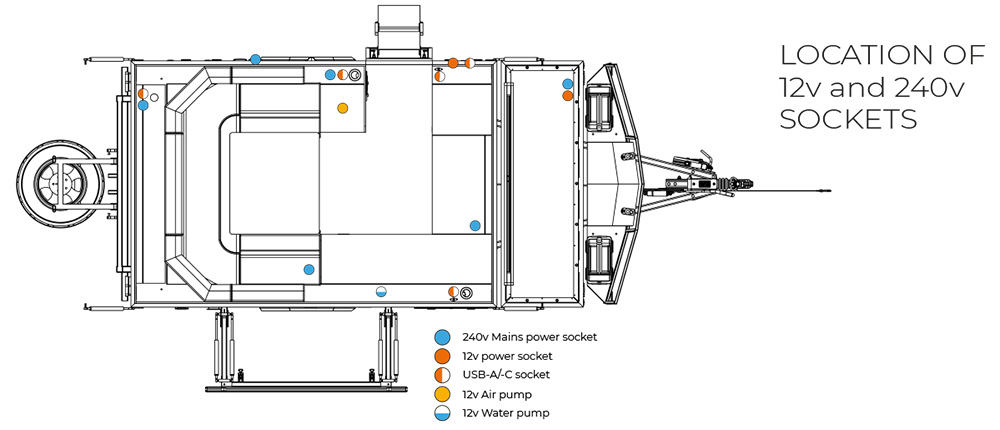
LOCATION OF 12v and 240v SOCKETS
WHETHER THE OPUS® LEISURE BATTERY HAS BEEN DEPLETED OR JUST USED FOR A SHORT PERIOD OF TIME (OR UNUSED FOR AN EXTENDED PERIOD IN STORAGE) IT MUST BE MAINTAINED IN A TOPPED-UP STATE EITHER VIA THE INTERNAL CHARGER (VIA MAINS HOOK UP) OR AN INDEPENDENT CHARGER (IF REMOVED FROM THE OPUS®). NOTE CHARGING TIMES MAY VARY, BUT IT MAY TAKE UP TO 48 HOURS TO FULLY CHARGE. LEAVING A BATTERY IN A PARTLY DISCHARGED STATE FOR A PERIOD OF WEEKS WILL PERMANENTLY REDUCE ITS CAPACITY TO HOLD CHARGE.
5. The control panel also has a battery volt-meter that will provide an indication of the remaining charge of the leisure battery. A full battery will be indicated by the total voltage shown on the display panel. A fully charged battery should have a total voltage of 12.6V. However, this can also be shown when the battery is in a state of charge when connected to the mains power.
6. There are five resettable overload mechanisms (fuses) above each switch on the control panel. If activated, simply press to reset. The system will also need to be checked by a qualified technician at the earliest opportunity to determine the cause of the tripped mechanism, as this may be an indication of a circuit/component fault.
7. The Whale Air Heater uses Gas only. Please ensure that the gas isolation valve is turned off when the heater is not in use. This also relates to the operation and use of the Whale Water Heater. Both heaters will come with user manuals as suggested by the manufacturer.
TAKE EXTRA CARE WHEN USING THE SOCKETS THAT ANY CABLE DOES NOT CAUSE A HAZARD, PARTICULARLY IN THE CASE OF SOCKETS NEXT TO THE HEATER.
SAFETY WARNING: DO NOT COVER THE FRONT OF THE HEATER.
DO NOT LEAVE ANYTHING IN FRONT OF OR NEAR THE HEATER WHILST IN OPERATION.
NEVER LEAVE THE OPUS® UNATTENDED WHILST THE HEATER IS IN OPERATION.
NEVER LEAVE THE HEATER ON WHEN SLEEPING.
WE SUGGEST PURCHASING A CARBON MONOXIDE ALARM TO INSTALL INSIDE YOUR CAMPER. THESE ALARMS ARE READILY AVAILABLE IN MOST DIY STORES.
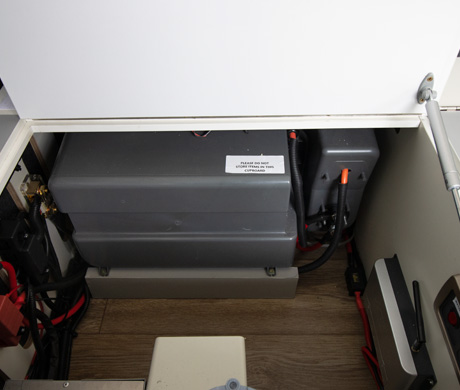
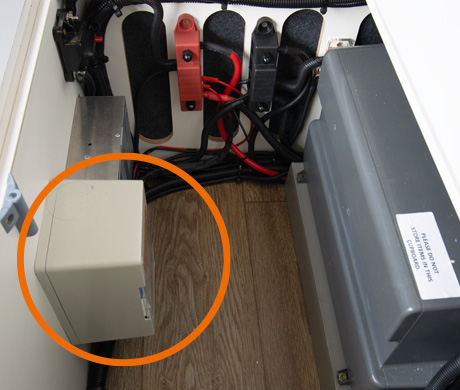
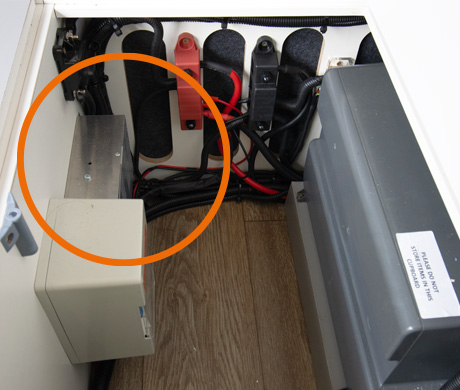
8. Within the off-side seat unit is the battery compartment box, the battery transformer and the mains electric consumer unit.
9. The consumer unit has circuit breakers that operate in the same way as your home’s domestic power supply and trip out in the event of some form of circuit/appliance overload. These are governed by a main RCD switch..
10. The mains electric input can be switched off using the RCD switch. If one of the breakers is tripped, it can be reset by flicking the switch up. However, if the breaker won’t reset there is a problem with one of the circuits or appliances attached to it and this must be attended to by a qualified technician at the earliest opportunity. The battery transformer is fully automatic and will recharge the leisure battery if the OPUS® is connected to an electric hook-up provided the MCB’ are on and in transit if the tow vehicle has the 13-pin or twin 7-pin sockets.
11. The battery transformer is fully automatic and will recharge the leisure battery if the OPUS® is connected to an electric hook-up provided the MCB’ are on and in transit if the tow vehicle has the 13-pin or twin 7-pin sockets
12. The ORX has an external 240V socket located to the left of the external storage access door. This can be accessed by sliding the grey Whale cover upwards.
DO NOT OVERLOAD THE 240V 3PIN SOCKET OUTLETS OF YOUR OPUS®. YOU CANNOT EXCEED 10A LOADING AT ANY ONE TIME WITHOUT ACTIVATING THE CIRCUIT BREAKERS
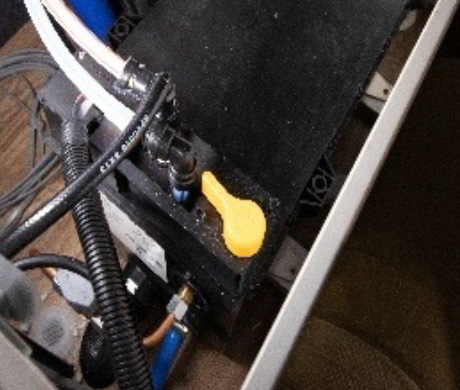
PLEASE ENSURE BEFORE PACKING DOWN THE OPUS® THAT THE ISOLATION SWITCH (7.1) IS TURNED ‘OFF’ FOR SAFETY REASONS. THIS IS ESSENTIAL IF CHARGING THE LEISURE BATTERY IN STORAGE.
IMPORTANT! IF YOU HAVE TO PACK DOWN THE CAMPER WET OR DAMP TO TRAVEL ENSURE IT IS OPENED WITHIN 24 HOURS AND LEFT TO DRY FULLY.
The pack down procedure is essentially the direct reverse of setting up.
Please note the following points:
1. Open the electrical power cupboard (No. 25)a and make sure the ‘Water Heater’ and ‘Heater’ switches are turned off.
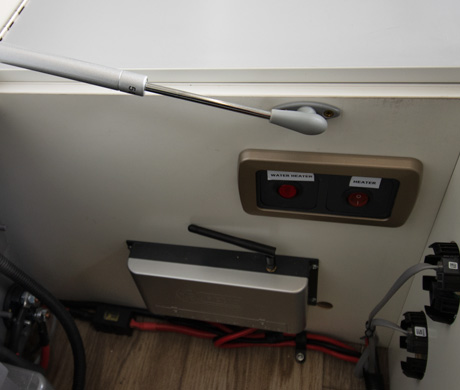
2. Open the hot water tank cupboard (No. 26) and turn the gas isolation valve off, if not already done.
3. Turn the flow valve to the 3 o’ clock position and allow the unit to drain any water from the bottom of the camper
4. Open the tap in the kitchen unit and allow any excess water to drain. Make sure the waste pipe beneath the sink is free of excess water.
5. Make sure all burners are turned off.
6. Fold down the tap, the drying rack, the flexible light and the lid over the gas hobs.
7. Make sure the gas supply is turned off, disconnect the hose and stow it in the compartment beneath the sink.
8. Make sure the waste pipe is dry, collapsed and stowed beneath the sink.
9. Make sure all of the compartments and drawers are properly closed.
When packing the kitchen down, make sure that the gas hose is disconnected and stowed away and that the waste water hose is collapsed and stowed. Failure to do this may lead to these components being damaged.
FOR SAFETY REASONS THE GAS HOSE CANNOT BE DISCONNECTED FROM THE
GAS VALVE WHILST THE GAS SUPPLY IS STILL TURNED ON.
10. Lift the supporting legs and press them in place until the catch secures them in place.
11. Once everything is folded or stowed away, gently push the kitchen area back into the body of the camper and secure it in place with the two spring-loaded bolts.
12. Lift the door back into place and push the locks closed.
13. Disconnect the electric hook-up cable (if fitted). Mover Isolation Key should be turned off and removed from the switch to prevent battery drain on standby when in storage
14. Ensure that all 4 roof window blinds are fully closed and that all side windows within the OPUS have both Perspex and solid window blinds fully closed to ensure no damage to window elements.
15. Secure both mattresses with the retaining straps. Bedding can be left in the bed areas but must also be secured under the retaining straps
16. Collapse the folding table and lay it flat on the floor inside the camper.
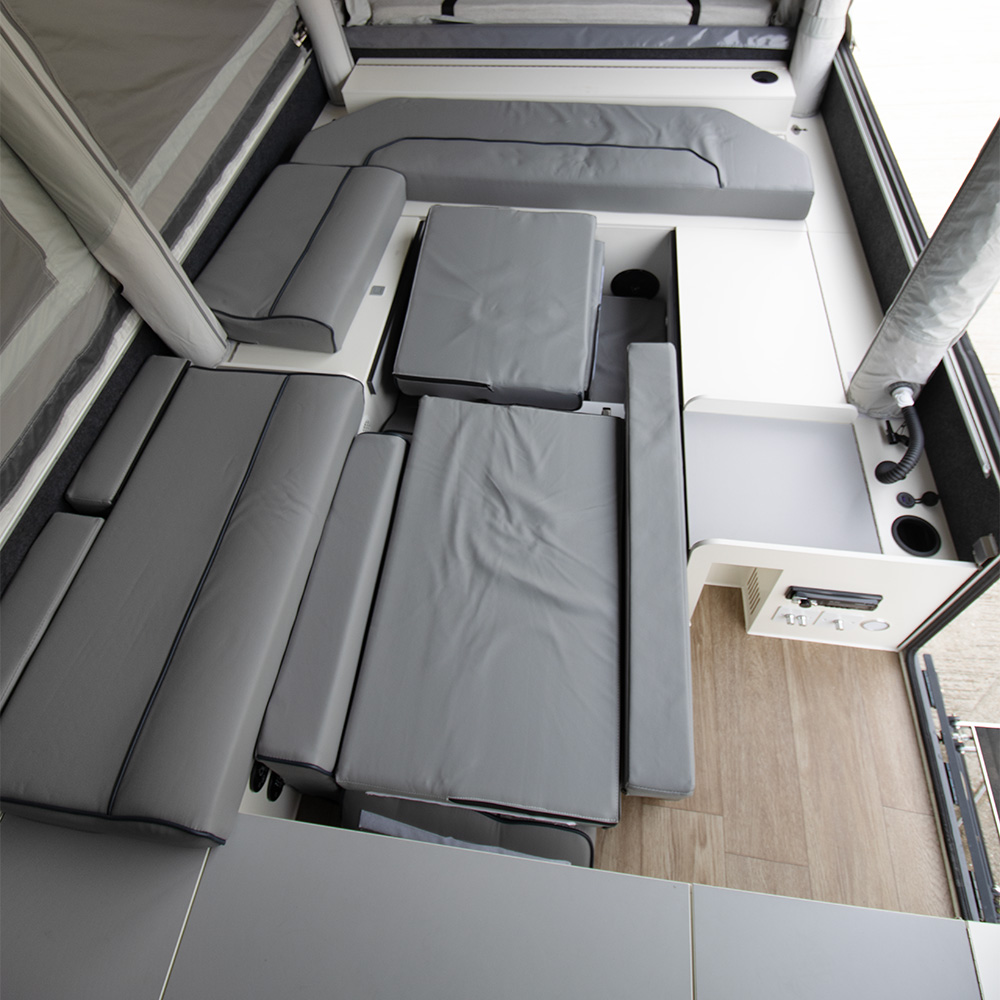
17. Disassemble the seating area and stow the cushions in a way that roughly resembles the photograph below. Be careful not to let any cushions sit more than one-cushion-width above the fixed benches. Ensure that the trailer is properly loaded and balanced as described in the sensible loading paragraph and image of this user manual.
A USEFUL REFERENCE FOR PACK-DOWN IS THAT NOTHING STORED WITHIN THE OPUS® FOR TRANSIT CAN BE TALLER THAN THE SEAT BASES; OTHERWISE IT WILL BE DIFFICULT TO CLOSE THE LIDS AND MAY CAUSE DAMAGE TO THEM IF THEY BECOME OBSTRUCTED.
18. Zip up the tent door, fold the entry steps away and close the trailer door, making sure it’s secure.

19. Now carefully open the five valves on the back side of the tent to deflate the tent. As the tent deflates carefully fold the canvas into the trailer. Ensure all canvas is housed inside the trailer body.
20. Remove the D-pins from the bed support posts on the underneath of the rear lid and rest the posts on the ground. Close the rear lid and fasten in place with the four latches. Tuck in all excess (protruding) canvas as you go
21. Unfasten the latches holding the front lid in place and close it, fastening it shut with the four latches.
IMPORTANT! IT IS ESSENTIAL THAT NO TENT MATERIAL IS VISIBLE WHEN THE LIDS ARE SECURED/CLOSED, AND THAT NO MATERIAL IS TOUCHING THE SEALS AROUND ALL SIDES OF THE OPUS® INCLUDING BEHIND THE HINGES.
22. Fold the bed support posts back into their transport position. Lift the spare wheel back into place and secure using the two spring-loaded bolts.
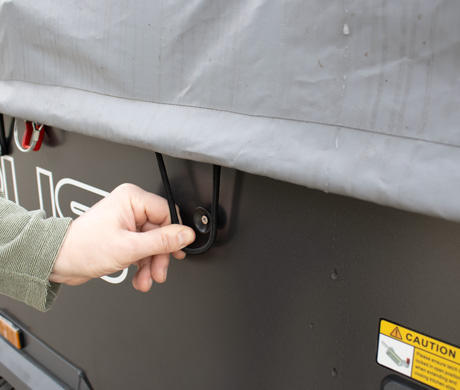
23. Roll the waterproof cover back over the trailer, making sure it fits squarely over the corners and that the hooks for the kayak carrier are through the cover. Reattach the bungee cords and S-hooks
24. Release the kayak carrier from its upright position by removing the D-pins and allowing it to drop back into place. Secure the latches on the door side of the camper and replace the D-pins on the back side.
25. Make sure any gas canisters in the locker are turned off and properly secured before moving the camper.
26. Secure the water and waste containers (if applicable) to the trailer on their carriers located either side of the gas locker at the front of the Camper using the straps provided.
27. Wind the corner steadies up and raise them back into place, taking care not to foul the heating exhaust.
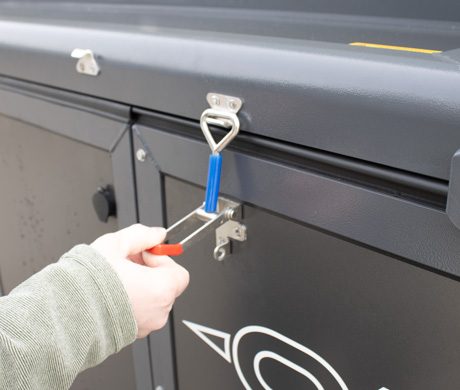
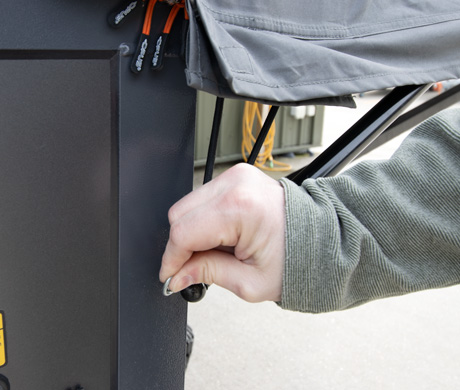
28. Before you attempt to tow the OPUS® Camper, ensure that the leisure battery is sitting in the tray provided, that the strap is tightly fastened across the battery, and most importantly; that the battery box door is locked correctly. Tip: When locking/unlocking the battery compartment – apply pressure to the front of the door. The lock turns through 180 degrees from a fully unlocked to locked position.
FAILURE TO CHECK THIS COULD HAVE SERIOUS CONSEQUENCES IN TRANSIT.
Your OPUS® is now ready to go.
ADHERE TO THE CORRECT HITCHING AND UNHITCHING PROCEDURES.
USEFUL GUIDES FOR SAFE AND LEGAL TOWING CAN BE FOUND ON LEADING
CAMPING AND CARAVANNING ORGANISATION WEBSITES.
PLEASE SEE HITCHING, UNHITCHING & SAFE TOWING SECTION.
Optional extra – OFC195C/D/E-194
Try to choose a site that is relatively flat. Avoid sites where the land may flood or where water will run down. DO NOT pitch directly under trees. Pitching near a hedge or wall may provide shelter against wind. AVOID areas with heavy pollution and where crop spraying may be in progress.
1. Remove the OPUS Air Sun Canopy (OASC) from the storage bag.
2. Unfold and locate zip on the OASC.
3. Place on the ground with zip closest to the OPUS Air Tent (OAT).
4. Inflate tent to head height and zip OASC onto OAT – place Velcro flap on OAT over zip on OASC and secure Velcro.
5. Locate OPUS air extension hose and insert into your main OPUS air pump hose.
6. Close 1 x air valve on the leg of OASC.
7. Open square valve cap which is inset on the air valve and insert Air Extension hose ensuring the extension hose is attached to the standard air pump hose.
8. Press inflation button on OPUS to inflate the OASC – The air pump will automatically cut out when the OASC is up to pressure (8psi) (note: inflation can also be completed with the OPUS hand pump (OFC195B-195E)
9. Remove the hose and re-tighten square valve cap to provide a tight seal after inflation.
10. Locate the black strap on the leg of the OASC and connect it to the clip on the other sun canopy leg – this can now be used as a guide for the distance between the legs.
11. With the distance confirmed connect the 3 x ladder bands to the ladder 3 x ladder clips on one of the OASC legs.
12. Secure the OASC legs to the floor by using the included tent pegs to secure the ladder bands into the ground.
13. Repeat for the other OASC leg.
14. OASC SET UP COMPLETE.
1. Deflate the main tent to head height
2. Remove pegs and ladder bands from OASC legs
3. Open the air valve on the leg of the OASC
4. Unzip and separate Velcro on the OASC from the OAT
5. Fold the OASC and place into the storage bag
The Air Sun Canopy can be left attached to your main tent. This method connects the Air Sun Canopy to the main tent inflation system to allow tent and canopy inflation in a single press of a button.
1. Remove the OPUS Air Sun Canopy (OASC) from the storage bag
2. Locate OASC spares and repairs pack within the clear side pocket of the storage bag and remove the interconnecting tube
3. Unfold and locate zip on the OASC
4. Place on the ground with zip closest to the OPUS Air Tent (OAT)
5. Now, with the camper deflated, step inside the OPUS and locate the unused black doner valve on the central middle beam (bladder no.3)
6. Unscrew the nipple on the doner valve and insert the interconnecting tube and re-tighten – ensure the spring is inside the interconnecting tube to avoid kinking.
7. Run the interconnecting tube through the accessory eyelet on the OAT
8. Zip the OASC onto OAT – and fold the OASC on itself so that is it sitting on top of the OAT to allow access to the underside of the OASC
9. Locate the black doner valve on the central beam of the OASC
10. Unscrew the nipple on the doner valve and insert the interconnecting tube and re-tighten
11. Ensure that both the doner valves on the OAT and OASC are now in the open position
12. Fold back over the OASC to the correct position for inflation.
13. Close 1 x main air valve on the leg of OASC
14. Press inflation button on OPUS to inflate the OAT and the OASC together at the same time – The air pump will automatically cut out when the OASC is up to pressure (8psi)
15. OASC ALWAYS CONNECTED SETUP IS NOW COMPLETE
1. Deflate the main tent to head height
2. Remove pegs and ladder bands from OASC legs
3. Open the air valve on the leg of the OASC
4. Fully deflate the main tent
5. Fold the OASC on top of the OAT ensuring the weight of the fabric is evenly distributed across the camper
6. Continue with OPUS pack down procedure
OFC195C-194E
Air Sun Canopy Storm Bar can be used to increase structural integrity of the Air Sun Canopy in adverse weather conditions
1. Install the OPUS Air Sun Canopy (OASC)
2. Unfold the OPUS Air Sun Canopy Storm Bars (SB) ensuring there are no twists
3. Locate the white inflation valve and close it
4. Open the square valve cap which is inset on the air valve and insert inflation hose
5. Press inflation button on OPUS to inflate the OASC SB to pressure (8psi) (note: inflation can also be completed with the OPUS hand pump (OFC195B-195E
6. Remove the hose and re-tighten square valve cap to provide a tight seal after inflation.
7. Locate the velcro patch on the OPUS AT and connect one end of the OASC SB
8. With the other end of the SB in hand, follow the centre beam of the OASC to the front of the canopy and connect other end of the SB to the Velcro patch on the canopy
9. Repeat on the other side
10. INSTALLATION COMPLETE
1. Remove the SB from the Velcro patches on the OASC and OAT
2. Open the air valve on the SB
3. Fold the SB and store
4. Repeat for the other side
Required items: OASC (OFC195E-194 2023 model)
Each leg of the OASC has 2 zip positions to allow installation of OPUS modular compatible accessories – it is possible to attach OPUS Air Windbreak Panels to the OASC (Air Wind Break Set [OFC195C-190], Air Gazebo [OFC195D-200] and Side Skirts [OFC195D-195E])
These items can be connected to the OASC to expand your camp using the zips on the OASC and accessories.
Required items: ASC (OFC195E/D/C-194)
LED lighting kit for awning (OFC 195C-013)
1. The OASC can have the OPUS LED lighting kit installed into the centre beam of the OASC.
2. Install the LED lighting strip into the lighting jacket of the centre beam of the OASC – using the clear plastic sleeve and zip opener
3. Plug the extension cable from a 12v socket in one of the corners of your camper
4. Run the cable through the accessory expansion slot at the top of the front of the tent
5. Plug the extension cable into the LED lighting strip.
Optional extra – OFC195B-102
Try to choose a site that is relatively flat. Avoid sites where the land may flood or where water will run down. DO NOT pitch directly under trees. Pitching near a hedge or wall may provide shelter against wind. AVOID areas with heavy pollution and where crop spraying may be in progress.
1. Prepare OPUS® ORX Camper as shown in the set-up section.
2. Inflate the OPUS main tent to head height and stop the pump.
3. Remove AIR Awning from the carry/storage bag.
4. Ensure the ground is free of stones and other sharp objects. Unpack and spread the AIR awning on the ground.
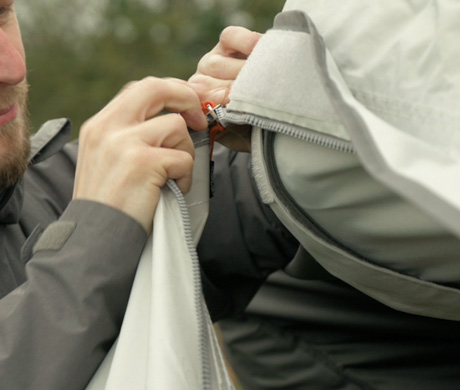
5. Slide the zip on the back of the AIR awning onto the zip on the front of the AIR tent. The zip is located under the flap above the front door.
6. Temporarily peg the 4 corners of the flysheet in line with your AIR OPUS® tent. You may need to re-peg these at a later stage.
7. Ensure the AIR tent and AIR awning are totally connected.
8. Inflate the OPUS main tent
9. Ensure all external AIR valves are closed to allow for inflation and ensure all internal valves are open.
10. Locate the awning extension hose and connect to the existing hose inside the OPUS.
12. Locate the white inflator valve on the awning and insert the awning extension hose into the inflator valve and press the button to activate the pump.
12. The AIR awning will inflate, ensure that no air beams are twisted during inflation. The pump will automatically switch off when the pressure has reached 7psi.

13. Close all internal valves. We recommend you keep all valves closed whilst product is in use.
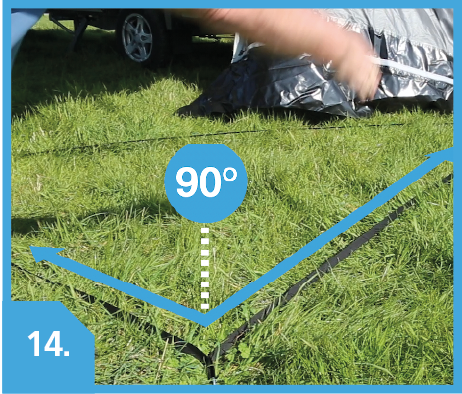
14. Clip in the two guide straps from the front left and right hand side air beams into rear beams.
15. Peg out the guide straps creating a 90 degree angle between the front and rear beams.
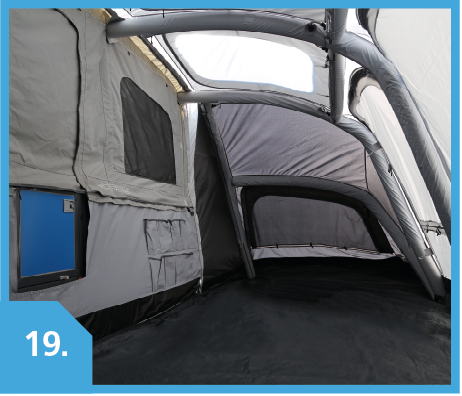
16. Zip in the 2 x side panels and the 2 x front doors.
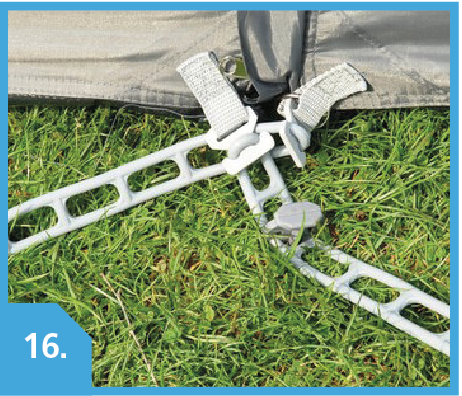
17. Peg out the storm straps and guy lines. Start with rear corners then peg the front corners, ensuring that there is no slack material between the four corners. Peg the remaining pegging points, cross pegging the doorways and entrances. Adjust the guy lines and storm straps as necessary.
18. Locate the front skirt and zip into the front of the OPUS main tent and peg out.
19. Attach the velcro sections of awning to the side of the main tent and front skirt,
20. Your AIR awning includes a groundsheet which may be used by carefully matching its Velcro to the relevant Velcro on the awning flysheet and the AIR tent skirt.
21. If required attach inner tents to internal fixings at both ends of the awning. The fixings are colour coded.
22. There are zipped PVC pockets for the use of LED light strips (optional extra) within some of your AIR awning roof beams.
PLEASE ENSURE BOTH AIR TENT AND AIR AWNING ARE COMPLETELY DRY BEFORE TAKING THEM DOWN AND PACKING THE UNIT AWAY.
1. Open all internal valves.
2. Open all external valves.
3. Undo the Velcro patches attaching the AIR tent and the AIR awning. Then unzip the AIR awning from the front zip located on the AIR tent.
4. Carefully fold the AIR awning canvas and place it back into carry/storage bags.
IMPORTANT! PLEASE READ THE SECTIONS WITH INFORMATION ON WEATHERING, TECHNOLOGY, INFLATION, DEFLATION, SAFETY, ALTERATIONS AND WARRANTY. ALL TEXT APPLIES TO THE AIR AWNING AS WELL AS THE AIR OPUS® TENT.
Optional extras – OFC195C-190 and OFC195C-191
1. Remove Air Windbreak from the carry/storage bag.
2. Ensure the ground is free of stones and other sharp objects. Unpack and spread the respective panels on the ground ensuring they are not twisted.
3. Locate and connect up your OPUS extension hose, attach this to the inflation point on the a windbreak panel. Alternatively, connect up the supplied hand pump for inflation.
4. Proceed to inflate/pump up each windbreak panel independently to 7PSI, ensuring not to over inflate.
5. Once inflated, be sure to screw on the caps of each inflation point, being careful to avoid over-tightening.
DO NOT ATTEMPT TO TIGHTEN VALVES USING THE SUPPLIED VALVE WRENCH. THIS WRENCH IS INCLUDED TO AID IN LOOSENING VALVES ONLY.
6. At this stage, check the shape of each panel, if when stood up the panel bends slightly, correct by laying flat and applying a small amount of pressure in the relevant areas to straighten.
7. With the panels inflated, arrange them in the desired order and zip the relevant ends to one another.
8. Once zipped together the panels can be stood up and arranged as desired.
9. Once located correctly, proceed to peg down each panel via the fabric loops at either bottom corner.
10. Where necessary, clip in guy straps and peg down to ensure stability of the panels, particularly in high winds.
11. Arrangements of panels can be manipulated, added to and relocated in any way desired. Additional large panels are available for purchase.
PLEASE ENSURE WINDBREAK PANELS ARE COMPLETELY DRY BEFORE TAKING THEM DOWN AND PACKING AWAY.
1. Remove all pegs and guy straps. Place these in the provided peg bag for safe keeping.
2. Lay panels flat down and open inflation/deflation valves, a valve wrench is provided for assistance in loosening where necessary. Allow all air to escape from the panels.
3. Unzip panels from one another.
4. Fold panels and place back in carry/storage bag.
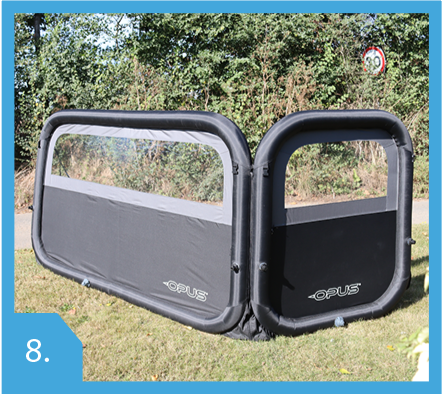
The OPUS® ORX comes with a fitted kayak carrier as standard.
THE ROOF PANELS ON THE OPUS® ARE NOT WEIGHT-BEARING. DO NOT PLACE ANY ITEMS/WEIGHT ON THE ROOF PANELS AS THIS COULD CAUSE DAMAGE TO THE ROOF.
 ROOF PANELS ARE NOT WEIGHT-BEARING
Check the sealants on the roof panels to ensure there has been no separation of the sealant to the panel or the frame of the Camper; this is important to prevent water ingress into the Camper and keep the roof water tight, to maintain this feature DO NOT stand on the panels of the OPUS®.
Each roof half (bed tray lid) should NEVER be subjected to a load more than 100kg.
THE KAYAK CARRIER IS NOT DESIGNED TO CARRY ANY WEIGHT ABOVE 200KG. THIS EFFECTIVELY BECOMES THE ‘LOAD CAPACITY CEILING’ FOR ANYTHING TO BE CARRIED ON IT.
Loads on the kayak carrier must be loaded and secured appropriately; The MTPLM of the Camper MUST NEVER be exceeded, this includes the weight of the Camper and everything inside and on it.
Ensure the trailer has the proper weight and balance and the nose weight is between 50-75kg and within the capacity of the towing vehicle.
If a roof box is to be used, ensure the load is within the limits and does not upset the weight and balance of the Camper to avoid adverse handling effects.
Refer to the loading illustration in the Sensible Loading Section for distribution of loads.
THE OPUS® CAMPER MUST NOT BE STORED WITH A WET OR DAMP INTERIOR. IF PACK DOWN WAS UNAVOIDABLE IN WET OR DAMP CONDITIONS, THE CAMPER MUST BE OPENED UP WITHIN 24 HOURS AND FULLY LEFT TO DRY INTERNALLY AND EXTERNALLY (TENT) BEFORE BEING REPACKED (PLEASE ENSURE THIS INCLUDES UNDER THE WINDOWS) AND STORED UNDER THE ROOF COVER PROVIDED. PLEASE ALSO CONSIDER YOUR AWNING/CANOPY CANVAS.
IF THE OPUS® IS ERECTED FOR LONG PERIODS, PLEASE INSPECT REGULARLY FOR SIGNS OF WATER INGRESSION AND THE EFFECTS OF DAMP. REFER TO ‘CARING FOR YOUR CANVAS’ WITHIN THE USER MANUAL.
If you have an awning, it can also be stored in the trailer. To do this, ensure it is packed and stored properly. DO NOT store a wet/damp awning inside the Camper. If your payload/packing prohibits the awning pieces to be stored together, fold the individual pieces and store neatly in with the units maximising the use of space.
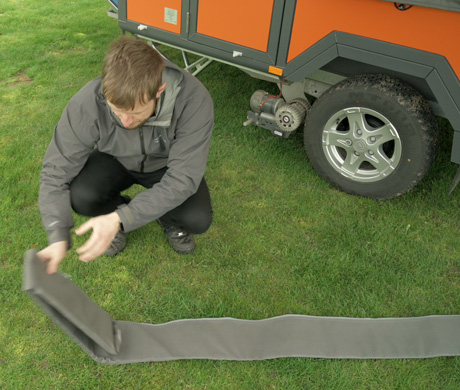
The front edge of the roof cover fits into an aluminium awning channel on the front panel of the Camper. This provides a secure fitment and MUST be attached in this manner when using the cover in transit.
THE ROOF COVER MUST BE USED WHENEVER YOU ARE NOT USING YOUR OPUS®. DO NOT USE THE LOAD CARRYING COVER FOR PROLONGED STORAGE NOR THE STORAGE COVER WHICH IS DUST PROOF ONLY.
IF YOUR OPUS® HAS BEEN STORED OR TRANSPORTED IN HEAVY WEATHER CONDITIONS WITHOUT THE ROOF COVER, IT NEEDS TO BE OPENED AND INSPECTED FOR WATER INGRESS AS SOON AS POSSIBLE. THIS IS TO ENSURE THE SEALS WERE CORRECTLY SEATED DURING THE PACK-DOWN AND THAT THEY HAVE NOT BEEN DAMAGED WITH TIME.
The larger storage cover (optional extra) is advised for an extended period of storage outdoors to keep your camper in pristine condition. Please note this is NOT WATERPROOF and must be used in conjunction with the full roof cover only.
It is strongly advised you clean off dirt and grime on the unit from travelling/terrain to keep your Camper in good condition and maximise its longevity.
If a leisure battery is fitted, please ensure it is charged immediately after use and for the required period. Do not leave the battery stored in a partly discharged state for longer than 48 hours. Charging the night before use is not a recommended principal.
Ensure the water and waste carriers are emptied after each use and contain no liquids if being stored.
Ensure that your Camper and accessories are fit for the road and you adhere to all local laws.
Check the wheels and tyres and ensure they are in good condition with the bolts correctly torqued. Check the tyre pressures before driving – 44 PSI / 3 BAR
Check the lights and fittings and ensure they are functioning correctly.
The chassis/running gear and the gas installation of your OPUS® Camper should be checked on an annual basis by a qualified service centre see – www.approvedworkshops.co.uk
The applicable manual is titled ‘BPW Maintenance and Operational Instructions – Light Trailer range 550kg-3500kg’
The technology used in your AIR OPUS® comprises of inflatable bladders, retained within a specially constructed grey tube which is held in position with a retaining sleeve within the tent/ flysheet. The zips on the grey sleeves are fastened with a fabric tie and should only be untied if you need to replace or repair a bladder. If you remove the ties fastening the zips, please ensure you secure the zips with the ties, in a closed position before re-inflation.
UNDER NO CIRCUMSTANCES REMOVE FASTENING TIES AND UNFASTEN ZIPS WHILE BLADDERS ARE INFLATED. FAILURE TO FOLLOW THIS INSTRUCTION WILL RESULT IN BLADDER FAILURE.
Please note that it may be necessary to monitor the AIR pressure in your AIR tubes from time to time, especially if the weather is fluctuating or the temperature is higher than average or colder than average.
Hot Weather – when the outside temperature rises it is probable that the pressure in the AIR tubes may increase and it will therefore be necessary to monitor the AIR tubes and release AIR using the external valves as required.
Cold Weather – a drop of pressure should not be considered a leak or puncture until further investigated. When the outside temperature drops it is probable that the pressure in the AIR tubes may decrease and it may therefore be necessary to monitor the AIR tubes and top up the AIR pressure as necessary.
A repair kit is enclosed with your AIR tent and includes an emergency repair patch for repair of small holes in your bladder.
Your OPUS® Tent is made from the best available materials. On first examination, you may find some slight variances in colour, thick threads, pigment stains and changes due to the weather and the environment. These are all normal and will not affect the performance of the product and are not faults or errors.
When your OPUS® ORX is not inflated, the window material may pick up some impressions from zips, tape, seams etc. This is quite normal and some of these impressions will disappear over time but some may remain. This is not a fault.
Please ensure your AIR tent is only packed away when completely dry. A wet/damp canvas will develop mildew/mould very quickly and damage your canvas permanently.
The inside and outside of your AIR tent can be cleaned but only with fresh clean water and a damp cloth. UNDER NO CIRCUMSTANCES MUST DETERGENTS OR CHEMICAL CLEANERS be used as these will damage your tent.
You may also experience, depending on the weather and use, condensation. This should not be confused with leakage. To reduce the risks of condensation, please ensure your OPUS® ORX is adequately ventilated. Please note that under certain conditions, all tents will suffer from internal condensation depending on atmospheric conditions, the weather, the amount of moisture in the air/ground, evening and night time temperatures etc. Condensation can be quite severe causing a film of water on the inside of your tent (roof and sides) which may drip onto items in your OPUS® ORX and in severe conditions can leave puddles of water.
Zips should be treated with care, use two hands when closing and opening and do not step on them during set up or take down. Never force a zip. If a zip opening is tight it is more than likely due to the fact that your awning is not pitched correctly. Candle wax may be used to help a zip run more smoothly.
Please remember that your AIR tent is a temporary structure made from natural fibres. Please note that in fibre products used in outdoor applications, product life may be low because of attack from UV or acid rain. Discolouration of the fabric may be an early indication that your tent has been attacked. To limit damage by UV, where ever possible, please site your OPUS® ORX in a shaded area avoiding direct sunlight. Please be aware that continuous exposure is a more serious problem than intermittent exposure, since UV attack is dependent on the extent and degree of exposure. Fabrics can be weakened by prolonged exposure to sunlight and use for extended periods in strong sunlight will soon cause deterioration. UV degradation is not covered under the OPUS® ORX warranty. The warranty does not cover air tents used permanently or for display purposes.
In order for the OPUS® to give you years of camping pleasure, the tent section needs to be cared for and MUST NOT be left wet/damp when packed away.
It is, of course unavoidable at times that you will have to pack down your OPUS® when the canvas is wet. It is very important that the OPUS® is opened up to dry off as soon as possible and should be done within 24 hours.

ENSURE THE COOKER/HOB UNIT HAS COOLED COMPLETELY BEFORE ATTEMPTING TO CLEAN.
Depending on the optional accessories fitted to your OPUS® you will find all relevant paperwork/manuals for these in the middle drawer of the kitchen area. Please read all of the relevant information within these user manuals to ensure correct usage.
The OPUS interior now contains a mix of technical fabrics of contrasting colour. Some of the darker fabrics are dyed and consequently this could transfer on to lighter fabric. The likelihood of this is increased when the OPUS is packed down, and materials are hard pressed against one another for long periods at differing temperatures.
To avoid the possibility of colour-transfer, our recommendations would be as follows:
Turn the dark cushions upside down, exposing the felt backing to the tent (there is no conflict between the colour-fast felt material and the tent material). This will help separate contact between the dark grey cushion tops and the tent, but you may wish to protect the cushion surfaces from the cupboard hinges by laying a suitable material between the two items.
Alternatively, A light-coloured, colour-fast material (such as a sofa throw or blanket) could be used to cover the cushion tops, before packing down.
Should colour transfer from dark to light material, we wish to reassure you that it will not affect the longevity or functionality of the material, but we appreciate the appearance is less than desirable and best avoided if possible.
Condensation needs to be considered in both the OPUS Camper and Full Awning (optional extra).
Condensation is caused by warm, moist air coming into contact with cold surfaces. Condensation can occur inside most tents and awnings, which may sometimes be misinterpreted as the fabric leaking.
There is always moisture in the air when you pitch a waterproof fabric above damp ground; however the situation is made worse by adding people who are breathing out warm water vapour. When the warm moist air inside comes into contact with the fabric of the OPUS Camper tent or the awning material, which is cooled by the outside air, condensation forms.
During rain more condensation can form due to lower outside temperature and drops can form and run down seams or fall on internal poles, giving the appearance of a leak.
There are a few main causes of condensation:
It is natural for the body to perspire (sweat) during the night; please ensure the Camper is WELL VENTILATED to avoid excessive condensation which could result in issues such as mould or damp if adequate care is not taken.
After a night’s sleep please INSPECT AND FLIP the mattress to ensure no condensation is present and the mattress is properly aired.
Suggestions below of tips & products that could help combat condensation.
Products:
Tips:
Ventilation is more important than is generally realised – your OPUS® Camper/ Full Awning has several windows/vents that can be opened to help increase air ventilation. An increase in ventilation will result in a decrease of condensation.
The chassis/running gear and the gas installation of your OPUS® Camper should be checked on an annual basis by a qualified service centre see – www.approvedworkshops.co.uk
To help prevent the build-up of water-borne bacteria, we recommend the following:
Reduction of water storage: Reduce the amount of stored water by emptying or purging water pipes and tanks after usage. Allow accessible pipes and tanks to dry out in the open.
Taps and Showerhead descaling and disinfection: Legionnaires’ disease is normally contracted by inhaling tiny, airborne droplets (aerosol) of legionella bacteria. Taps and Showers are a notorious source of aerosol, therefore the hose, inserts and heads must be dismantled, cleaned, flushed, descaled and disinfected on a quarterly basis using a product such as Puri Sol or similar.
The build-up of limescale within a hot water is a common cause of systems not working efficiently. It can result in both a reduction of water flow and poor temperature control. Chemical cleaning can remove limescale which both reduces the risk of legionella using a product such as D Scale or similar.
If you are experiencing any problems with the running lights:
If the lights are blinking too fast or erratically or not turning on at all (this might be encountered if you change your towing vehicle):
Symptoms:
OPUS Lights flashing/OPUS lights flickering/OPUS lights not working at all
Troubleshooting:
Ensure that the 13pin connector on your vehicle is functioning correctly, this can be tested either at your local main dealer or by connecting another trailer if available to see if the issue persists. Plug-in Smart Load Relay may be required*
*The towing vehicle CAN Bus system continually sends pulses to the towing sockets to detect the presence of a trailer. This is fine with conventional bulb lighting, but depending on the sensitivity of the CAN BUS system of the towing vehicle it may not detect the modern LED lighting used on the OPUS. This is because LED bulbs draw very little current (which is why they are so efficient). This means that some vehicles cannot sense that the OPUS is connected. The solution is to simulate the current draw of conventional bulb lighting so the towing vehicle recognises the fact it is actually hitched up the OPUS.
The heater will only operate on 240v/mains power supply.
If the heater is not turning on, check the safety switch underneath the seat – below cushion 1. If the switch is on and the heater is still not functioning its fuse might be blown. The heater only needs to be turned on for a short time to warm up the inside of the Camper when required and should be switched off afterwards, the Camper’s insulating properties will maintain this temperate condition.
Never leave the heater on overnight, when sleeping, unattended or for a prolonged period of time.
Never obstruct the heater.
The fridge runs off ‘mains’ electrics; the dedicated fridge 12v socket is available for use (with compatible tow vehicle electrics) simply to keep the fridge ‘cool’ during transit.
The fridge should not be used on gas inside the Camper or in an enclosed space.
If any of the 12v sockets are not working, the fuse for the 12v appliances may have blown, check and replace if necessary.
If a LED light or polarity sensitive appliance is not working on the 12v sockets but is functional then the polarity of the affected socket will need to be reversed. Please contact us on 01473 601200 for advice.
If the mains sockets are not working check the circuit breaker underneath Seat 1 (Page 16) to see if the switch has been tripped, reset this if necessary.
If the circuit breaker was tripped by a fault/issue that has not been resolved (breaker will trip after reset) then this needs to be investigated further.
Extension sockets may be used on the 12v and 240v mains electric if required but must be of adequate rating for the required function/load to avoid an electric/fire hazard.
If an issue occurs on a socket or electric appliance using an extension then it may be overloaded.
AVOID daisy chains of extensions and check that the rating (total) of the appliances being used does not exceed the stated extension socket/Campers rating.
The battery is recharged in transit if compatible electrics are used. If this is not the case or the Camper is being stored for a prolonged period of time then an alternative charger should be used to the keep the battery in a working condition.
The 12v electrics may not function properly or at all if there is insufficient charge in the battery, the battery charge can be monitored by the meter located on the main electric panel by the door of the Camper. Please refer to Page 21 for more information.
Please note the green LED light on this panel is only shown when connected to a main supply, normally when the battery is being charged.
Please ensure you have not left the inlet house in the white master valve. This must be removed and the cap replaced. Please ensure all external valves are fully closed. If the deflation persists, please listen for air loss at the internal bladder valves.
It is recommended and advised within your instructions that when your AIR OPUS® tent and awning are in use that all internal valves are closed. If this is the case then your faulty AIR tube/bladder will already be isolated and the impact of the faulty bladder will be minimal. Please check this is the case. If not please close all internal valves.
The awning rail is the anchor for the tent canvas to attach to the Camper’s body; the awning beading should remain central on the awning rail.
If the tent gets caught or snagged on the awning rail, retrace the setup/pack down steps to guide the awning beading to prevent damage to the tent.
It is normal for the tent’s awning beading to be able to move within the rail unless movement is hindered; DO NOT over tension the tent and NEVER force the tent to move along the rail, inspect for the hindrance and rectify before moving the tent’s awning beading.
Small holes, rips and tears can be rectified using a suitable tent repair kit or sealer. Always keep a kit with you in case of emergencies.
Larger damages may require the services of a professional, if in doubt or require any assistance please contact us on 01473 601200 for advice.
AVOID putting strain on the wrap around velcro straps that retain the poles on the tent as this may damage the stitching on the tent and/or encourage water ingress through enlarged holes. If damage to the stitching occurs, this needs to be repaired as soon as possible. For small damage use a fabric repair/sewing kit, otherwise seek a professional service or contact us.
Once a damage has occurred or a repair have been done on the tent stitching, consider using a ‘seam sealer’ or an appropriate repair kit to seal any needle holes or stitching gaps and keep the tent waterproof.
The bungees of the tent are made of durable elastic and will last for a very long time if not overstretched or abused.
If damage occurs on the bungees then it can be replaced by using a suitable alternative; depending on the section damaged this may require stitching/sewing or a knot at the ends of the bungee to retain it in the tent.
Stubborn stains can be removed using specialist products such as Fenwicks cleaning for awnings and tents.
When using a new/unfamiliar product try it on a small inconspicuous area and only use when satisfied with the suitability and result of the product.
Depending on the location and extent of the stain, the Camper may need to be set up to clean the tent. The tent may need to be re-proofed after cleaning, see section on the following page.
Reproofing is required as part of the maintenance of the tent to help restore its water runoff properties after prolonged used and exposure. Frequency of reproofing will depend on the use of the Camper.
Reproofing may also need to be done if some cleaning products have been used on the tent.
Areas to be mindful of are where tent panels are connected together or experience stresses i.e. stitches and seams. Grangers Fabsil Waterproofer or a suitable alternative may be used for this purpose.
If water ingress/leaks occurs which are not as result of condensation or incorrect pack down procedure then determine the location(s) and possible causes for the leak.
It is possible that minor leaks are due to the fact that the canvas has not been subjected to a weathering process. We selectively use Cotton Canvas on the OPUS® due to the materials superior durability and breathability. This means, as with all natural Cotton Canvas tents, the OPUS has to go through a weathering process before all the cotton fibres in the weave will swell and nestle into each other. This may result in drops of water passing through the canvas on its first few uses in wet conditions. The good news is those last few drips will go and you will be left with a perfectly waterproof tent and one that will give you years of good service if it is looked after.
If the leak is a result of holes, rips or tears (visible) damage then repair/address as described in the Rip & Tears section. Otherwise contact us or a professional for advice.
If it is difficult to zip the awning to the tent or side skirts etc. examine the zip(s) for any damage or cause of obstructions. Never force the zip.
If the zips are different on the tent section to the awning section/side skirts then zip adapters may be required. Contact us on 01473 601200 for more information.
If the hob is not functioning correctly:
DO NOT leave the gas flowing or the gas hob on if the burner is not in use.
Ensure the gas bottle is connected properly every time the gas bottle is changed.
Follow the manufacturers procedure/recommendations for any issues pertaining to the gas hob itself.
If the water supply has been set up correctly then fresh water should flow out of the tap and waste water out of the external outlet respectively.
If water is not flowing out of the tap check the hoses and connections, next check the pump and switch and that the fresh water container has enough water and the pump is fully submerged.
The waste water hose of the sink unit should be connected to the provided aperture on the kitchen base unit, the outlet (on the exterior) of the Camper should also be opened to prevent blockage or back flow of water. The supplied convoluted hose should also be connected to the outlet and into a suitable container or drain.
The pump should be submerged in a suitable container filled with water. NEVER run the pump dry.
The pump must be connected to the external socket, for it to function properly and supply water to the sinks tap.
The pump switch is located on the control panel by the door of the Camper and must be turned on for it to work. After initial turn on of the pump it may operate for a short while, this is normal and simply ‘primes’ the pump to readily supply water on demand.
Depending on location and flow of the water, if the flow of water is not as desired, the pressure may require adjustment. This can be adjusted via a rotary switch at the back of the pump socket which is accessible from the inside of the Camper (underneath the Kitchen base unit).
Further information can be found in Water System section.
If the wheel on your Camper has to be changed please remember to re-torque the bolts to the correct torque setting. For alloy wheels the correct setting is 130Nm and for steel wheels the correct setting is 88Nm.
You should check the pressure of your tyres regularly and before each journey with your OPUS®. The correct pressure is 44PSI or 3BAR. This is correct for tyres/wheels supplied with your OPUS® if you have modified the tyres/wheels please adhere to the recommendations of the tyre/wheel manufacturer.
If you have chosen the Spare Wheel and Carrier option this will always been supplied in the form of a steel wheel. Please note that if the spare wheel is required for use then the torque setting is less than that of the alloy wheels usually used on the OPUS®.
As of 26th August 2025, there are new rules that apply to those towing any trailer (including caravans or trailer campers) that weigh more than 750kg through most countries in the European Union.
Owners planning on taking their OPUS® Camper to the EU must register with the DVLA in advance of their trip to obtain a registration certificate and trailer-specific number plate.
See our handy links below for more information on the legal requirements and what you need to do before travelling.
gov.uk/guidance/trailer-registration
gov.uk/register-trailer-to-take-abroad
gov.uk/government/publications/trailer-registration-numbers-and-number-plates-inf291
FOR WARRANTY AND AFTER SALES, PLEASE CONTACT YOUR SUPPLYING DEALER IN THE FIRST INSTANCE.
OPUS® guarantees the camper for leisure usage for 12 months from the date of collection. The AIR tube technology is covered for a period of 24 months from this date.
OPUS® will bear the costs of labour and parts (transportation excluded) on goods repaired under this warranty provided that:
Items or Repairs not covered under this warranty include:
THIS DOES NOT AFFECT YOUR STATUTORY RIGHTS.
The manufacturer and/or their recognised agents/dealers, directors, employees or insurers will not be liable for consequential or other damages, losses or expenses in connection with or by reason of the inability to use the product for any purpose.
Any claim(s) arising due to missing parts or faulty goods MUST be made before use. The manufacturer will not be responsible for any claims regarding missing parts or faulty items where the product has not been checked by the user prior to use.
Once you have received authorisation, please return the OPUS® to your place of purchase for inspection. The cost of transportation is not covered under this warranty. In the event of the product being returned for assessment, it must be sent in a completely dry and clean condition.
Please ensure all personal possessions are removed. Failure to do this will also deem the product unfit for inspection.
This warranty is not transferable.
Register your OPUS® warranty online within 14 days of collection at: www.purpleline.co.uk/product-registration
General Enquiries: enquiries@opuscamper.co.uk
Marketing Enquiries: marketing@opuscamper.co.uk
Warranty Enquiries: warranty@opuscamper.co.uk
01473 601200
OPUS® Terms & Conditions and Warranty information can be found online at: www.opuscamper.co.uk/terms-conditions.html
Photographs and diagrams are for illustration purposes only. Actual product may vary and any specifications are subject to change without prior notice. All information correct at time of publishing. Purple Line Ltd 2026.
Our patents: our-patents.info/purpleline
REVISION NUMBER: OPF195A.Rev1